
PydanticAI 简介
PydanticAI[1] 是一个 Python 代理框架,目标是让开发者能够更轻松地使用生成式人工智能(LLMs)构建生产级应用程序。它由 Pydantic 团队开发,继承了 Pydantic 的强大功能和 FastAPI 的设计理念,致力于为生成式人工智能应用开发带来更高效、更易用的体验。
项目特点
主要特点
-
由 Pydantic 团队开发:由开发了 Pydantic 的团队打造,确保了其与 Pydantic 的无缝集成。 -
模型无关性:支持 OpenAI、Anthropic、Gemini 等多种模型,并提供简单接口支持其他模型。 -
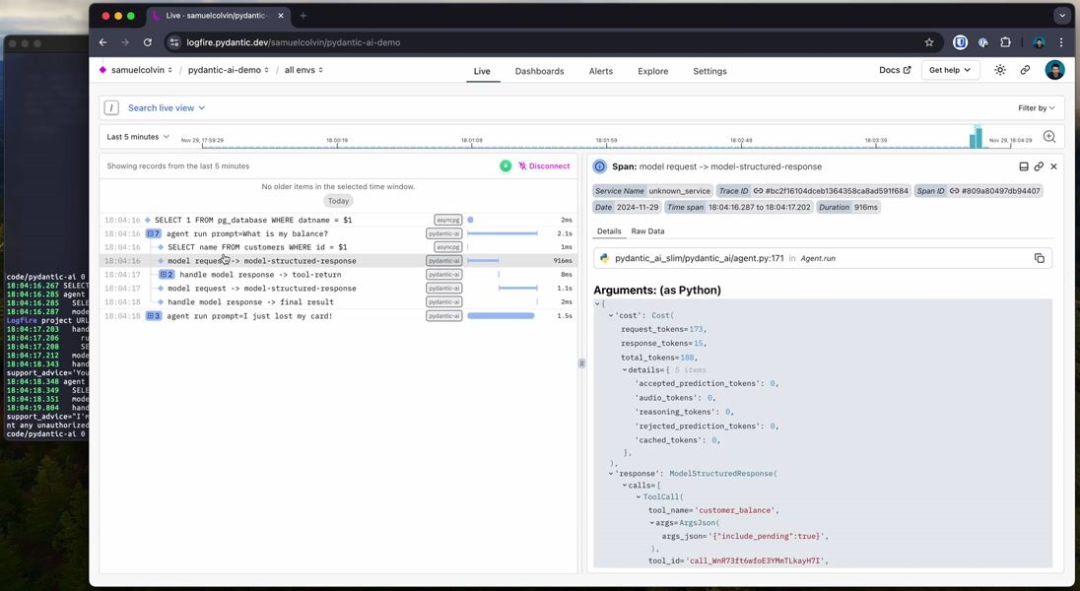
Pydantic Logfire 集成:与 Pydantic Logfire 无缝集成,支持实时调试、性能监控和行为跟踪。 -
类型安全:通过 Pydantic 的类型检查功能,确保代码的类型安全。 -
Python 风格设计:利用 Python 的控制流和代理组合来构建 AI 驱动的项目,易于应用 Python 的最佳实践。 -
结构化响应:使用 Pydantic 验证和结构化模型输出,确保每次运行的响应一致。 -
依赖注入系统:提供可选的依赖注入系统,用于为代理的系统提示、工具和结果验证器提供数据和服务。 -
流式响应:支持连续流式输出 LLM 结果,并即时验证。 -
图支持:通过 Pydantic Graph 提供强大的图定义功能,适用于复杂应用。
使用场景
PydanticAI 适用于需要与生成式人工智能(LLMs)交互的各种场景,例如:
-
客户服务代理:构建银行或客服支持代理,提供实时客户支持和风险评估。 -
复杂应用开发:在需要复杂控制流和结构化响应的应用中,利用 PydanticAI 的图支持功能。 -
实时调试与监控:通过与 Pydantic Logfire 的集成,实时监控和调试 LLM 驱动的应用程序。
项目使用
安装方法
-
完整安装:
-
使用以下命令安装 PydanticAI 及其所有核心依赖项:
pip install pydantic-ai
-
需要 Python 3.9 或更高版本。
-
使用 Pydantic Logfire(可选):
-
如果需要与 Pydantic Logfire 集成,安装带有 logfire选项的 PydanticAI:
pip install "pydantic-ai[logfire]"
-
安装完成后,按照 Logfire 的文档进行配置。
-
安装示例代码:
-
如果需要运行示例代码,安装带有 examples选项的 PydanticAI:
pip install "pydantic-ai[examples]"
-
安装完成后,按照示例代码的文档运行示例。
-
精简安装(Slim Install):
-
如果只使用特定的模型,可以安装精简版本 pydantic-ai-slim,并根据需要选择安装特定模型的依赖项。例如,仅使用 OpenAI 模型:
pip install "pydantic-ai-slim[openai]"
-
支持的模型和依赖项选项包括: -
logfire:安装 Logfire 相关依赖。 -
openai:安装 OpenAI 相关依赖。 -
vertexai:安装 Vertex AI 相关依赖。 -
anthropic:安装 Anthropic 相关依赖。 -
groq:安装 Groq 相关依赖。 -
mistral:安装 Mistral 相关依赖。 -
cohere:安装 Cohere 相关依赖。 -
duckduckgo:安装 DuckDuckGo 搜索相关依赖。 -
tavily:安装 Tavily 相关依赖。 -
也可以同时安装多个模型的依赖,例如:
pip install "pydantic-ai-slim[openai,vertexai,logfire]"
使用方法
-
导入 PydanticAI:
-
在 Python 脚本中导入所需的模块,例如:
from pydantic_ai.agent import Agent
from pydantic_ai.models.openai import OpenAIModel
-
创建和配置模型:
-
根据需要创建和配置模型。例如,使用 OpenAI 模型:
model = OpenAIModel(api_key="your_openai_api_key")
-
运行模型或代理:
-
使用模型或代理执行任务。例如,运行一个简单的任务:
agent = Agent(model=model)
result = agent.run("What is the weather like today?")
print(result)
简单示例
以下是 PydanticAI 的一个简单示例,展示了如何定义一个代理并与 LLM 进行交互:
from pydantic_ai import Agent

# 定义一个简单的代理,指定使用的模型
agent = Agent(
    'google-gla:gemini-1.5-flash',
    system_prompt='Be concise, reply with one sentence.'
)

# 同步运行代理,与 LLM 进行对话
result = agent.run_sync('Where does "hello world" come from?')
print(result.data)
高级用法
以下是一个更复杂的示例,展示了如何使用依赖注入和工具来构建一个银行支持代理:
from dataclasses import dataclass
from pydantic import BaseModel, Field
from pydantic_ai import Agent, RunContext

# 定义依赖项
@dataclass
class SupportDependencies:
    customer_id: int
    db: DatabaseConn

# 定义结果模型
class SupportResult(BaseModel):
    support_advice: str = Field(description='Advice returned to the customer')
    block_card: bool = Field(description="Whether to block the customer's card")
    risk: int = Field(description='Risk level of query', ge=0, le=10)

# 创建支持代理
support_agent = Agent(
    'openai:gpt-4o',
    deps_type=SupportDependencies,
    result_type=SupportResult,
    system_prompt='You are a support agent in our bank...'
)

# 定义动态系统提示
@support_agent.system_prompt
asyncdef add_customer_name(ctx: RunContext[SupportDependencies]) -> str:
    customer_name = await ctx.deps.db.customer_name(id=ctx.deps.customer_id)
    returnf"The customer's name is {customer_name!r}"

# 定义工具
@support_agent.tool
asyncdef customer_balance(ctx: RunContext[SupportDependencies], include_pending: bool) -> float:
    """Returns the customer's current account balance."""
    balance = await ctx.deps.db.customer_balance(id=ctx.deps.customer_id, include_pending=include_pending)
    return balance

# 运行代理
asyncdef main():
    deps = SupportDependencies(customer_id=123, db=DatabaseConn())
    result = await support_agent.run('What is my balance?', deps=deps)
    print(result.data)
参考文档
-
官方文档[2] -
Pydantic Logfire 文档[3]
注:本文内容仅供参考,具体项目特性请参照官方 GitHub 页面的最新说明。
欢迎关注&点赞&在看,感谢你的阅读~
Github地址: https://github.com/pydantic/pydantic-ai
[2]官方文档: https://ai.pydantic.dev/
[3]Pydantic Logfire 文档: https://pydantic.dev/logfire
(文:AIGC创想者)