


PydanticAI 是一个 Python 代理框架,旨在减轻构建生产级生成式 AI 应用的痛苦。
FastAPI 通过其创新且符合人体工程学的设计,基于 Pydantic 的基础,革新了 Web 开发。
同样,几乎每一个 Python 中的代理框架和 LLM 库都使用 Pydantic,但当我们在 Pydantic Logfire 中开始使用 LLM 时,却找不到任何能带来同样感觉的框架。
PydanticAI 的构建目标简单:将 FastAPI 的体验带入生成式 AI 应用开发。

为什么选择 PydanticAI
由 Pydantic 团队构建
由 Pydantic 团队开发,Pydantic 是 OpenAI SDK、Anthropic SDK、LangChain、LlamaIndex、AutoGPT、Transformers、CrewAI、Instructor 等众多项目的验证层。
模型无关
支持 OpenAI、Anthropic、Gemini、Ollama、Groq 和 Mistral,并提供简单接口以支持其他模型。
Pydantic Logfire 集成
与 Pydantic Logfire 无缝集成,支持实时调试、性能监控和 LLM 驱动应用的行为跟踪。
类型安全
设计旨在最大化类型检查的效用,与 mypy 和 pyright 等静态类型检查器良好集成。
以 Python 为中心的设计
利用 Python 熟悉的控制流和代理组合来构建 AI 驱动项目,使其易于应用标准 Python 最佳实践,与其他(非 AI)项目一致。
结构化响应
利用 Pydantic 的强大功能验证和结构化模型输出,确保跨运行的响应一致性。
依赖注入系统
提供可选的依赖注入系统,为代理的系统提示、工具和结果验证器提供数据和服务。这对测试和基于评估的迭代开发非常有用。
流式响应
支持持续流式传输 LLM 输出,并进行即时验证,确保快速且准确的结果。
模型
PydanticAI 是模型无关的,内置支持以下模型提供商:
•OpenAI•Anthropic•Gemini(通过两个不同 API:生成语言 API 和 VertexAI API)•Ollama•Groq•Mistral
您还可以添加对其他模型的支持。
PydanticAI 还提供 TestModel 和 FunctionModel 用于测试和开发。
要使用每个模型提供商,您需要配置本地环境并确保安装了正确的软件包。
代码示例
以下代码解释了 PydanticAI 的基本用法,这是一个用于构建 LLM 驱动应用的框架:
示例 1:
导入和设置:
from pydantic importBaseModel,Fieldfrom pydantic_ai importAgent,ModelRetry,RunContext,Toolfrom pydantic_ai.models.openai importOpenAIModel
•导入 Pydantic 和 PydanticAI 的必要组件•nest_asyncio.apply() 启用 Jupyter 笔记本中的异步操作•load_dotenv() 加载环境变量(可能包含 API 密钥)
模型初始化:
model =OpenAIModel("gpt-4o-mini")•创建 OpenAI 模型接口的实例
基本代理创建:
agent =Agent(model,system_prompt='Be concise, reply with one sentence.',)
•创建一个简单代理,包含:•指定的 OpenAI 模型•指示代理简洁回答的系统提示
代理执行:
result = agent.run_sync('Where does "hello world" come from?')print(result.data)
输出:

关键特性:
•类型安全:使用 Pydantic 进行类型验证和安全•结构化响应:通过 Pydantic 模型实现结构化输出•生产就绪:设计用于生产环境,具备适当的错误处理•异步支持:支持同步和异步操作
这是一个展示 PydanticAI 基本设置和使用的简单示例,展示了如何创建处理查询并返回结构化响应的简单代理。该框架特别适合构建具有类型安全和结构化数据处理的强大 AI 应用。
示例 2:
# --------------------------------------------------------------# 2. 简单代理 - Hello World 示例# --------------------------------------------------------------"""此示例展示PydanticAI代理的基本用法。关键概念:-使用系统提示创建基本代理-运行同步查询-访问响应数据、消息历史和成本"""agent1 =Agent(model=model,system_prompt="You are a helpful customer support agent. Be concise and friendly.",)# 基本代理的使用示例response = agent1.run_sync("How can I track my order #12345?")print(response.data)
输出:

示例 3:
# --------------------------------------------------------------# 3. 具有结构化响应的代理# --------------------------------------------------------------"""此示例展示如何从代理获取结构化、类型安全的响应。关键概念:-使用Pydantic模型定义响应结构-类型验证和安全-字段描述以提高模型理解"""classResponseModel(BaseModel):"""带有元数据的结构化响应。"""response: strneeds_escalation:boolfollow_up_required:boolsentiment: str =Field(description="客户情绪分析")agent2 =Agent(model=model,result_type=ResponseModel,system_prompt=("You are an intelligent customer support agent. ""Analyze queries carefully and provide structured responses."),)response = agent2.run_sync("How can I track my order #12345?")print(response.data.model_dump_json(indent=2))
Pydantic 模型定义:
•使用 Pydantic 的 BaseModel 创建结构化响应模型•定义四个特定类型的字段:•response:包含答案的字符串•needs_escalation:是否需要升级的布尔值•follow_up_required:是否需要跟进的布尔值•sentiment:用于情绪分析的字符串
高级代理创建:
•此处创建了 agent2
响应处理:
•此处创建了 response•执行查询并将响应格式化为 JSON
输出示例:

{"response":"You can track your order #12345 by...","needs_escalation":false,"follow_up_required":true,"sentiment":"neutral"}
示例 4:
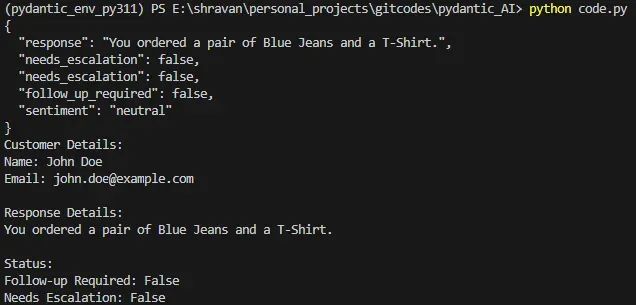
# --------------------------------------------------------------# 4. 具有结构化响应和依赖的代理# --------------------------------------------------------------"""此示例展示如何在代理中使用依赖和上下文。关键概念:-使用Pydantic定义复杂数据模型-注入运行时依赖-使用动态系统提示"""# 定义订单模式classOrder(BaseModel):"""订单详情的结构。"""order_id: strstatus: stritems:List[str]# 定义客户模式classCustomerDetails(BaseModel):"""客户查询的结构。"""customer_id: strname: stremail: strorders:Optional[List[Order]]=NoneclassResponseModel(BaseModel):"""带有元数据的结构化响应。"""response: strneeds_escalation:boolfollow_up_required:boolsentiment: str =Field(description="客户情绪分析")# 具有结构化输出和依赖的代理agent5 =Agent(model=model,result_type=ResponseModel,deps_type=CustomerDetails,retries=3,system_prompt=("You are an intelligent customer support agent. ""Analyze queries carefully and provide structured responses. ""Always greet the customer and provide a helpful response."),# 这些在编写代码时已知)# 基于依赖添加动态系统提示async def add_customer_name(ctx:RunContext[CustomerDetails])-> str:return f"Customer details: {to_markdown(ctx.deps)}"# 这些依赖于运行时未知的上下文customer =CustomerDetails(customer_id="1",name="John Doe",email="john.doe@example.com",orders=[Order(order_id="12345", status="shipped", items=["Blue Jeans","T-Shirt"]),],)response = agent5.run_sync(user_prompt="What did I order?", deps=customer)response.all_messages()print(response.data.model_dump_json(indent=2))print("Customer Details:\n"f"Name: {customer.name}\n"f"Email: {customer.email}\n\n""Response Details:\n"f"{response.data.response}\n\n""Status:\n"f"Follow-up Required: {response.data.follow_up_required}\n"f"Needs Escalation: {response.data.needs_escalation}")
数据模型定义:
•定义三个 Pydantic 模型以处理结构化数据•创建模型层次结构(CustomerDetails 包含 Orders)——类对象(Order、CustomerDetails、ResponseModel)
高级代理配置:
•指定响应类型和依赖类型•包含重试逻辑(3 次尝试)•设置基本系统提示
动态系统提示:
•将运行时上下文添加到系统提示•使用装饰器模式进行动态提示•将客户详情转换为 Markdown 格式
响应处理:
•打印格式化的 JSON 响应•显示客户详情和响应状态
输出:
关键特性:
•依赖注入:通过 deps 提供运行时上下文•复杂数据建模:支持关系嵌套模型•动态提示:上下文感知的系统提示•类型安全:全程类型检查•错误处理:重试机制确保可靠性
示例 5:
# --------------------------------------------------------------# 5. 具有工具的代理# --------------------------------------------------------------"""此示例展示如何使用自定义工具增强代理。关键概念:-创建和注册工具-在工具中访问上下文"""shipping_info_db:Dict[str, str]={"12345":"Shipped on 2024-12-01","67890":"Out for delivery",}# 定义订单模式classOrder(BaseModel):"""订单详情的结构。"""order_id: strstatus: stritems:List[str]# 定义客户模式classCustomerDetails(BaseModel):"""客户查询的结构。"""customer_id: strname: stremail: strorders:Optional[List[Order]]=NoneclassResponseModel(BaseModel):"""带有元数据的结构化响应。"""response: strneeds_escalation:boolfollow_up_required:boolsentiment: str =Field(description="客户情绪分析")customer =CustomerDetails(customer_id="1",name="John Doe",email="john.doe@example.com",orders=[Order(order_id="12345", status="shipped", items=["Blue Jeans","T-Shirt"]),],)def get_shipping_info(ctx:RunContext[CustomerDetails])-> str:"""获取客户的运输信息。"""return shipping_info_db[ctx.deps.orders[0].order_id]# 具有结构化输出和依赖的代理agent5 =Agent(model=model,result_type=ResponseModel,deps_type=CustomerDetails,retries=3,system_prompt=("You are an intelligent customer support agent. ""Analyze queries carefully and provide structured responses. ""Use tools to look up relevant information.""Always greet the customer and provide a helpful response."),# 这些在编写代码时已知tools=[Tool(get_shipping_info, takes_ctx=True)],# 通过关键字参数添加工具)async def add_customer_name(ctx:RunContext[CustomerDetails])-> str:return f"Customer details: {to_markdown(ctx.deps)}"response = agent5.run_sync(user_prompt="What's the status of my last order?", deps=customer)response.all_messages()print(response.data.model_dump_json(indent=2))print("Customer Details:\n"f"Name: {customer.name}\n"f"Email: {customer.email}\n\n""Response Details:\n"f"{response.data.response}\n\n""Status:\n"f"Follow-up Required: {response.data.follow_up_required}\n"f"Needs Escalation: {response.data.needs_escalation}")
数据库模拟:
•模拟一个简单的运输信息数据库
数据模型(与前例相同):
自定义工具定义:(此处为 get_shipping_info)
•创建一个查找运输信息的工具•接受上下文参数以访问客户详情•返回运输状态字符串
增强的代理配置:
•通过 tools 参数添加工具•指定工具需要上下文(takes_ctx=True)
动态系统提示:
•add_customer_name 方法负责接受动态系统提示
输出:

示例 6:
# --------------------------------------------------------------# 6. 具有反思和自我纠正的代理# --------------------------------------------------------------"""此示例展示具有自我纠正的高级代理功能。关键概念:-实现自我反思-通过重试优雅处理错误-使用ModelRetry进行自动重试-基于装饰器的工具注册"""# 模拟的运输信息数据库shipping_info_db:Dict[str, str]={"#12345":"Shipped on 2024-12-01","#67890":"Out for delivery",}# 定义订单模式classOrder(BaseModel):"""订单详情的结构。"""order_id: strstatus: stritems:List[str]classResponseModel(BaseModel):"""带有元数据的结构化响应。"""response: strneeds_escalation:boolfollow_up_required:boolsentiment: str =Field(description="客户情绪分析")# 定义客户模式classCustomerDetails(BaseModel):"""客户查询的结构。"""customer_id: strname: stremail: strorders:Optional[List[Order]]=Nonecustomer =CustomerDetails(customer_id="1",name="John Doe",email="john.doe@example.com",orders=[Order(order_id="12345", status="shipped", items=["Blue Jeans","T-Shirt"]),],)# 具有反思和自我纠正的代理agent5 =Agent(model=model,result_type=ResponseModel,deps_type=CustomerDetails,retries=3,system_prompt=("You are an intelligent customer support agent. ""Analyze queries carefully and provide structured responses. ""Use tools to look up relevant information. ""Always greet the customer and provide a helpful response."),)# 通过装饰器添加普通工具def get_shipping_status(order_id: str)-> str:"""获取给定订单 ID 的运输状态。"""shipping_status = shipping_info_db.get(order_id)if shipping_status isNone:raiseModelRetry(f"No shipping information found for order ID {order_id}. ""Make sure the order ID starts with a #: e.g, #624743 ""Self-correct this if needed and try again.")return shipping_info_db[order_id]# 示例用法response = agent5.run_sync(user_prompt="What's the status of my last order 12345?", deps=customer)response.all_messages()print(response.data.model_dump_json(indent=2))
关键特性:
自我纠正机制:
•使用 ModelRetry 进行自动重试•提供有用的错误信息以进行自我纠正•验证订单 ID 格式
基于装饰器的工具:
•使用 @agent5.tool_plain() 装饰器•简化工具注册•提供清晰的工具定义语法
错误处理:
•优雅处理缺失数据•自动重试机制•提供信息丰富的错误信息
输入验证:
•检查订单 ID 格式是否正确•提供纠正指导•保持数据完整性
输出:

总结
我们通过 PydanticAI 框架探索了不同类型的代理使用方式。完全归功于(daveebbelaar)。无论如何,这确实展示了很多潜力,作为一个新框架,您可以使用非常简单的抽象来选择不同的 LLM,设置系统提示,动态更改系统提示。能够注入不同的内容,并轻松设置历史记录,以便拥有一些记忆功能。这是以非常 Pythonic 的方式完成的。在许多方面,比 LangChain、LangGraph、LlamaIndex 等框架更容易理解。我们可以尝试将其与 RAG 系统结合使用。未来我可能会进一步探索这一点,也想比较不同框架及其差异。敬请期待!!!
请关注或评论如果您觉得这有帮助 ❤️🙏
参考资料:
•https://ai.pydantic.dev/•https://github.com/daveebbelaar/pydantic-ai-tutorial/blob/main/src/introduction.py
(文:PyTorch研习社)