

本文由 @Simon V(https://github.com/simveit) 授权转载和翻译并发表到本公众号。原始地址为:https://veitner.bearblog.dev/a-short-note-on-tensorcores-and-inline-ptx-assembly/
关于TensorCore和Inline PTX Assembly的简短笔记
2025年5月9日
Tensorcores是GPU上专用的单元,用于执行矩阵乘法。为了充分利用它们的潜力,我们需要编写Inline PTX Assembly。这篇简短的笔记旨在通过利用PTX指令来揭开TensorCore的神秘面纱。
MMA
从PTX文档(https://docs.nvidia.com/cuda/parallel-thread-execution/#warp-level-matrix-instructions)中我们可以找到:矩阵乘法和累加操作的形式为D = A * B + C,其中D和C被称为累加器,可能引用相同的矩阵。有两种操作可以执行warp级别的MMA操作:wmma和mma。在这篇博客中,我们将重点介绍mma指令,因为它们的灵活性更高。注意,在Hopper上,为了获得最高的性能,应该使用wgmma指令。
半精度指令的形式为:
mma.sync.aligned.m8n8k4.alayout.blayout.dtype.f16.f16.ctype  d, a, b, c;
mma.sync.aligned.m16n8k8.row.col.dtype.f16.f16.ctype  d, a, b, c;
mma.sync.aligned.m16n8k16.row.col.dtype.f16.f16.ctype d, a, b, c;

.alayout = {.row, .col};
.blayout = {.row, .col};
.ctype   = {.f16, .f32};
.dtype   = {.f16, .f32};
用于mma的替代浮点指令的形式为:
mma.sync.aligned.m16n8k4.row.col.f32.tf32.tf32.f32        d, a, b, c;
mma.sync.aligned.m16n8k8.row.col.f32.atype.btype.f32      d, a, b, c;
mma.sync.aligned.m16n8k16.row.col.f32.bf16.bf16.f32       d, a, b, c;
mma.sync.aligned.shape.row.col.dtype.f8type.f8type.ctype  d, a, b, c;
mma.sync.aligned.m16n8k32.row.col.kind.dtype.f8f6f4type.f8f6f4type.ctype d, a, b, c;

.atype      = {.bf16, .tf32};
.btype      = {.bf16, .tf32};
.f8type     = {.e4m3, .e5m2};
.f8f6f4type = {.e4m3, .e5m2, .e3m2, .e2m3, .e2m1};
.ctype      = {.f16, .f32};
.dtype      = {.f16, .f32};
.shape      = {.m16n8k16, .m16n8k32};
.kind       = {.kind::f8f6f4};
可以在PTX文档中找到mma.sync.aligned.m16n8k16.row.col.f32.f16.f16.f32的骨架:
mma.sync.aligned.m16n8k16.row.col.f32.f16.f16.f32
  {%Rd0, %Rd1, %Rd2, %Rd3},
  {%Ra0, %Ra1, %Ra2, %Ra3},
  {%Rb0, %Rb1},
  {%Rc0, %Rc1, %Rc2, %Rc3};
下面我们可以看到累加器矩阵的布局:
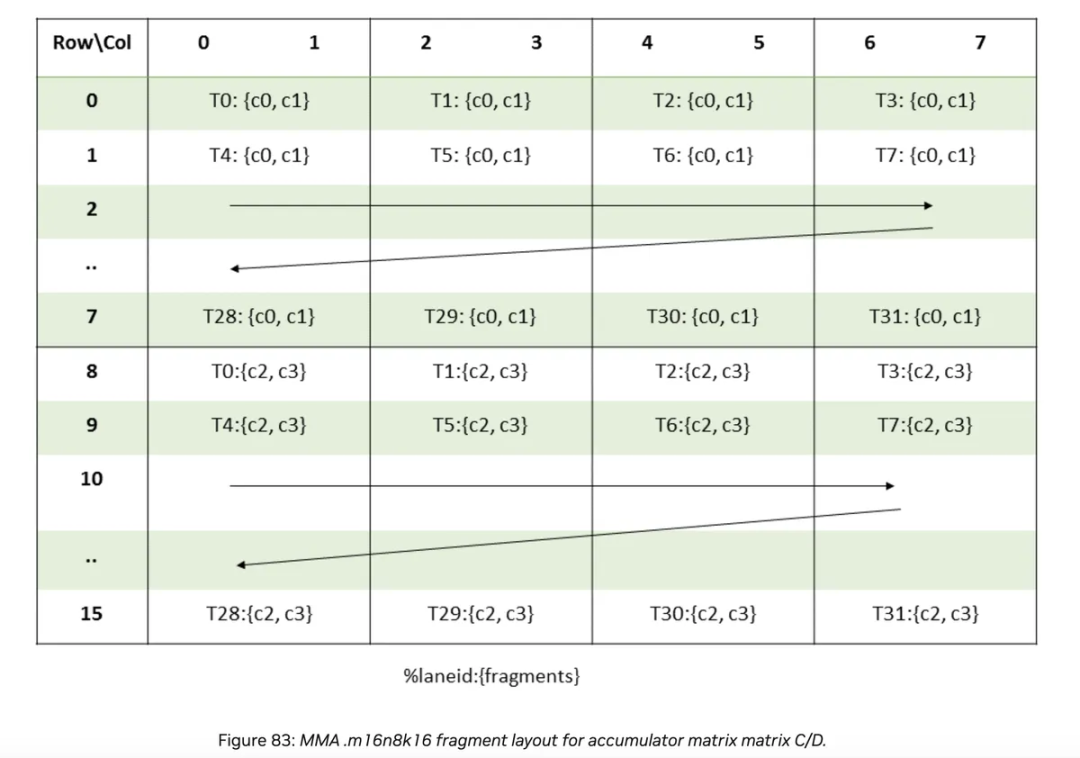
每个线程处理4个元素c0, c1, c2, c3。c1和c2之间的距离是8 * 8个元素。c0和c1一起是8 bytes = 2 * sizeof(float)
代码示例来自stack overflow(https://stackoverflow.com/questions/78146946/does-ptx-8-4-not-cover-smaller-shape-wmma-instructions).
#include <mma.h>
#include <cuda_fp16.h>
#include <iostream>
#include <stdio.h>

__global__ void mma_fp16_acc_fp32(float *out) {
  float c[4] = {0., 0., 0., 0.};
  float d[4] = {0., 0., 0., 0.};
  half a[8] = {1., 1., 1., 1., 1., 1., 1., 1.};
  half b[4] = {1., 1., 1., 1.};
  unsigned const *rA = reinterpret_cast<unsigned const *>(&a);
  unsigned const *rB = reinterpret_cast<unsigned const *>(&b);
  float const *rC = reinterpret_cast<float const *>(&c);
  float *rD = reinterpret_cast<float *>(&d);
  asm("mma.sync.aligned.m16n8k16.row.col.f32.f16.f16.f32 "
      "{%0,%1,%2,%3}, {%4,%5,%6,%7}, {%8,%9}, {%10,%11,%12,%13};\n"
      : "=f"(rD[0]), "=f"(rD[1]), "=f"(rD[2]), "=f"(rD[3])
      : "r"(rA[0]), "r"(rA[1]), "r"(rA[2]), "r"(rA[3]), "r"(rB[0]), "r"(rB[1]),
        "f"(rC[0]), "f"(rC[1]), "f"(rC[2]), "f"(rC[3]));
  memcpy(out + threadIdx.x * 2, rD, 8);
  memcpy(out + 8 * 8 + threadIdx.x * 2, rD + 2, 8);
}

int main() {
  std::cout << "mma.sync.aligned.m16n8k16.row.col.f32.f16.f16.f32" << std::endl;
  float *h_C = (float *)malloc(16 * 8 * sizeof(float));
  float *d_C;
  cudaMalloc(&d_C, 16 * 8 * sizeof(float));
  mma_fp16_acc_fp32<<<1, 32>>>(d_C);
  cudaDeviceSynchronize();
  cudaMemcpy(h_C, d_C, 16 * 8 * sizeof(float), cudaMemcpyDeviceToHost);
  for (int i = 0; i < 16; i++) {
    for (int j = 0; j < 8; j++) std::cout << h_C[i * 8 + j] << " ";
    std::cout << std::endl;
  }
}
我们现在逐步分析代码:
float c[4] = {0., 0., 0., 0.};
float d[4] = {0., 0., 0., 0.};
half a[8] = {1., 1., 1., 1., 1., 1., 1., 1.};
half b[4] = {1., 1., 1., 1.};

unsigned const *rA = reinterpret_cast<unsigned const *>(&a);
unsigned const *rB = reinterpret_cast<unsigned const *>(&b);
float const *rC = reinterpret_cast<float const *>(&c);
float *rD = reinterpret_cast<float *>(&d);
我们在一个warp中共同执行操作。D = A * B + C,其中C/D: 16 x 8,A: 16 x 16和B: 16 x 8。这意味着我们每个lane_id有256 / 32 = 8个元素用于A,有128 / 32 = 4个元素用于其他。
类型转换是必要的,以满足PTX寄存器类型(https://docs.nvidia.com/cuda/parallel-thread-execution/#warp-level-matrix-instructions)的约束:
"h" = .u16 reg
"r" = .u32 reg
"l" = .u64 reg
"q" = .u128 reg
"f" = .f32 reg
"d" = .f64 reg
这意味着我们将a解释为一个包含4个元素的数组,每个元素由2个half值组成。同样适用于b。
然后我们调用
asm("mma.sync.aligned.m16n8k16.row.col.f32.f16.f16.f32 "
  "{%0,%1,%2,%3}, {%4,%5,%6,%7}, {%8,%9}, {%10,%11,%12,%13};\n"
  : "=f"(rD[0]), "=f"(rD[1]), "=f"(rD[2]), "=f"(rD[3])
  : "r"(rA[0]), "r"(rA[1]), "r"(rA[2]), "r"(rA[3]), "r"(rB[0]), "r"(rB[1]),
 "f"(rC[0]), "f"(rC[1]), "f"(rC[2]), "f"(rC[3]));
然后我们使用
memcpy(out + threadIdx.x * 2, rD, 8);
memcpy(out + 8 * 8 + threadIdx.x * 2, rD + 2, 8);
我们可以通过查看上面的布局来理解这一点。我们将前8 bytes(即2个元素)写入布局的上半部分,然后跳过8 * 8 = 64个条目,并将最后8 bytes写入布局的下半部分。
如果我们想选择bfloat16数据类型而不是f16,这很简单:
#define bf16 __nv_bfloat16
#define f2bf16 __float2bfloat16
__global__ void mma_fp16_acc_fp32(float *out) {
  float c[4] = {0., 0., 0., 0.};
  float d[4] = {0., 0., 0., 0.};
  bf16 a[8] = {f2bf16(1.), f2bf16(1.), f2bf16(1.), f2bf16(1.),
               f2bf16(1.), f2bf16(1.), f2bf16(1.), f2bf16(1.)};
  bf16 b[4] = {f2bf16(1.), f2bf16(1.), f2bf16(1.), f2bf16(1.)};
  unsigned const *rA = reinterpret_cast<unsigned const *>(&a);
  unsigned const *rB = reinterpret_cast<unsigned const *>(&b);
  float const *rC = reinterpret_cast<float const *>(&c);
  float *rD = reinterpret_cast<float *>(&d);
  asm("mma.sync.aligned.m16n8k16.row.col.f32.bf16.bf16.f32 "
      "{%0,%1,%2,%3}, {%4,%5,%6,%7}, {%8,%9}, {%10,%11,%12,%13};\n"
      : "=f"(rD[0]), "=f"(rD[1]), "=f"(rD[2]), "=f"(rD[3])
      : "r"(rA[0]), "r"(rA[1]), "r"(rA[2]), "r"(rA[3]), "r"(rB[0]), "r"(rB[1]),
        "f"(rC[0]), "f"(rC[1]), "f"(rC[2]), "f"(rC[3]));
  memcpy(out + threadIdx.x * 2, rD, 8);
  memcpy(out + 8 * 8 + threadIdx.x * 2, rD + 2, 8);
}
非常相似,我们可以使用float8输入矩阵:
#define f8 __nv_fp8_e4m3
__global__ void mma_fp8_acc_fp32(float *out) {
  float c[4] = {0., 0., 0., 0.};
  float d[4] = {0., 0., 0., 0.};
  f8 a[8] = {f8(1.), f8(1.), f8(1.), f8(1.), f8(1.), f8(1.), f8(1.), f8(1.)};
  f8 b[4] = {f8(1.), f8(1.), f8(1.), f8(1.)};
  unsigned const *rA = reinterpret_cast<unsigned const *>(&a);
  unsigned const *rB = reinterpret_cast<unsigned const *>(&b);
  float const *rC = reinterpret_cast<float const *>(&c);
  float *rD = reinterpret_cast<float *>(&d);
  asm("mma.sync.aligned.m16n8k16.row.col.f32.e4m3.e4m3.f32 "
      "{%0,%1,%2,%3}, {%4,%5}, {%6}, {%7,%8,%9,%10};\n"
      : "=f"(rD[0]), "=f"(rD[1]), "=f"(rD[2]), "=f"(rD[3])
      : "r"(rA[0]), "r"(rA[1]), "r"(rB[0]), "f"(rC[0]), "f"(rC[1]), "f"(rC[2]),
        "f"(rC[3]));
  memcpy(out + threadIdx.x * 2, rD, 8);
  memcpy(out + 8 * 8 + threadIdx.x * 2, rD + 2, 8);
}
注意,我们需要的寄存器比a和b少,因为sizeof(half)/sizeof(fp8)=2。
简要分析SASS
我们可以使用godbolt(https://godbolt.org/)加载SASS代码(https://godbolt.org/)来理解不同的SASS指令用于执行矩阵乘法。相关的指令是HMMA,它负责在TensorCore上的矩阵乘法。
mma_fp16_acc_fp32(float*):
...
 HMMA.16816.F32 R4, R4, R10, RZ
...
mma_bfp16_acc_fp32(float*):
...
 HMMA.16816.F32.BF16 R4, R4, R10, RZ
...
mma_fp8_acc_fp32(float*):
...
 HMMA.1688.F32 R8, R4, R4, RZ
 NOP
 HMMA.1688.F32 R4, R4, R4, R8
...
有趣的是,float8 kernel执行两个HMMA.1688.F32指令,而不是类似HMMA.16816.F32.F8的东西。
(文:GiantPandaCV)