

Datawhale干货
作者:骆秀韬,Datawhale成员
Datawhale干货
作者:骆秀韬,Datawhale成员
按照 5.5 元 ~ 7.0 元每小时的价格计算,3 张 A800 花费最低为 3 * 5.5 * 20 = 330 元,预计花费接近 420 元,而 TinyZero(https://github.com/Jiayi-Pan/TinyZero) 项目用了 4 张 A800 训练了 8 小时,预计花费为:224 元,这中间的差异可能是由于硬件性能瓶颈和框架差异带来的(我们用的是 Huggingface TRL,TinyZero 使用的是 veRL)。所以建议大家如果真的要复现,请使用 TinyZero 项目,我们出于教育目的使用 TRL 为大家报告这个结果。
另外,不是所有人都能随时随地调用 3 张 A800 的,我们正在努力减小硬件资源要求,让复现工作尽可能平民化(比如在 4090 上跑)。在这里特别感谢:似然实验室,提供本次复现的计算资源,并与 Datawhale 团队合作贡献了本教程。
回到正题,首先回答一个关键问题:为什么这个方案更贵,而我们却选择了它?答案就是:它更符合教育目的,截止本文发布,大部分同学没有足够的资源来亲手体验复现流程,但是我们希望大家能更清楚的看到,复现 R1 Zero 的过程中都发生了什么,真正对复现原理有个大致把握,就算做“云玩家”也要学到知识,看完骆师傅做一遍就好像自己也做了一遍。
本方案在 mini-r1(https://www.philschmid.de/mini-deepseek-r1)的基础上改进而来。
环境搭建
配置基础工具
首先我们要搭建环境,作为手把手教程以及骆师傅的看家本领,我们会在这部分说得细致些。结合国内的实际情况,我们需要的环境信息如下:
暂时无法支持非 Linux 系统(Windows、MacOS)
-
CUDA > 12.0 (我们使用的是 CUDA 12.4) -
Python 建议版本为 3.12(我们使用 Miniforge 管理虚拟环境) -
Pytorch 版本为 2.5.1 (GPU版本,请使用 torch.cuda.is_available() 检查能否正常识别 GPU 设备)
建议使用 Miniforge / Conda 来安装 Pytorch,我们在南方科技大学的开源镜像源测试,下载速度会比官网 pip 安装快不少,请在下面的网址找到适合你硬件的 2.5.1 版本:https://pytorch.org/get-started/previous-versions/,推荐使用 mamba 安装(安装 Miniforge 后直接将 conda 替换为 mamba)
编译安装 flash-attn
接着重头戏就来了,我们需要编译安装 Flash Attention 包,这步非常消耗 CPU 资源,非常不建议CPU核心少的玩家执行。如果你没有办法在“有生之年”编译完 Flash Attention,可以在 https://github.com/Dao-AILab/flash-attention/releases/ 找到与你环境对应的编译好的包。(没对应上的话,改环境反而更快,相信我,编译很慢)
这个步骤倒是很简单,执行下面的命令:
pip install packaging
pip install ninja # 用于加速编译

# 编译安装 Flash Attention 包
pip install flash-attn --no-build-isolation

# 注意!如果你的设备CPU核心多,但是运行内存小于 96 GB,请适当设置 MAX_JOBS 的数量,并替换为下面的命令,参考:https://github.com/Dao-AILab/flash-attention#installation-and-features
MAX_JOBS=4 pip install flash-attn --no-build-isolation
按下回车后,可以泡杯咖啡,打开 htop 看 CPU 疯狂运作,再重新品读一遍《DeepSeek-R1: Incentivizing Reasoning Capability in LLMs via Reinforcement Learning》(https://arxiv.org/abs/2501.12948)
等待 flash-attn 安装完毕后,我们就可以安装其他涉及到的库了,我们提供了一份 requirements.txt 在 Unlock-DeepSeek(https://github.com/datawhalechina/unlock-deepseek)项目,核心列表如下:
setuptools<71.0.0
transformers==4.48.1
datasets==3.1.0
accelerate==1.3.0
hf-transfer==0.1.9
deepspeed==0.15.4
trl==0.14.0
vllm==0.7.0
modelscope==1.22.3
swanlab==0.4.6
huggingface-hub==0.28.1
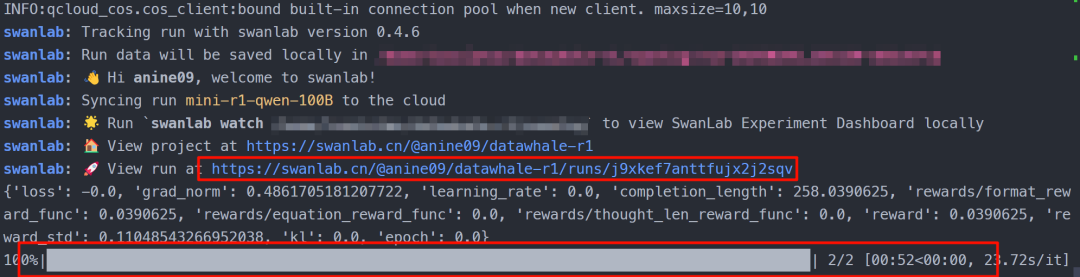
大家也可以在这个地址找到我们所有涉及的 Python 包列表:https://swanlab.cn/@anine09/datawhale-r1/runs/4tp31j1zxbm1fshjsi53b/environment/requirements
下载模型和数据集
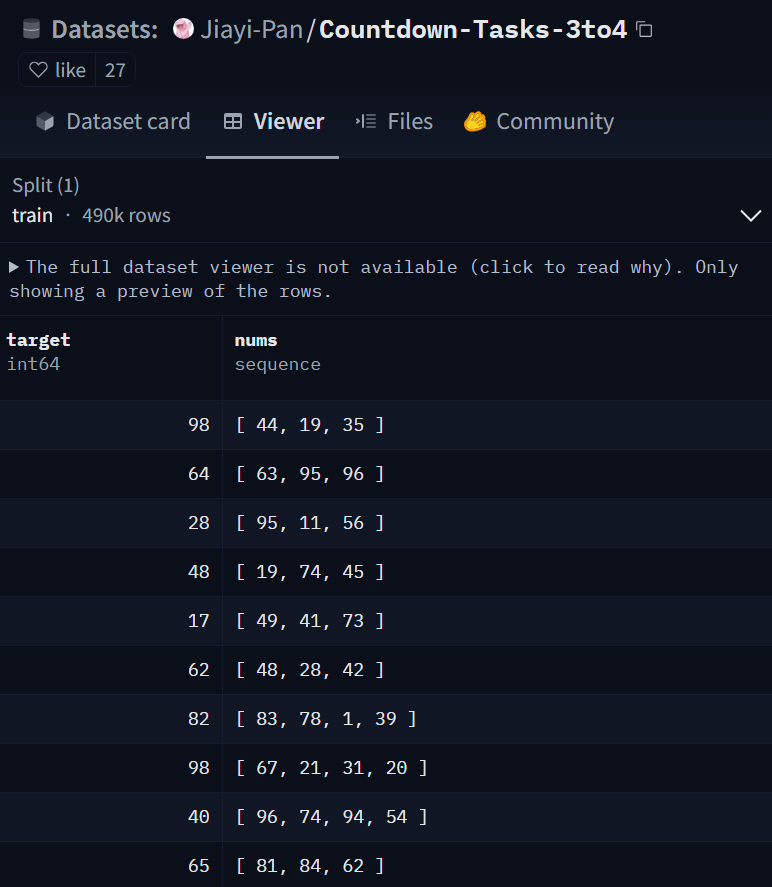
接下来我们需要下载数据集和模型,在本次实验中,我们使用的数据集为:Jiayi-Pan/Countdown-Tasks-3to4(https://huggingface.co/datasets/Jiayi-Pan/Countdown-Tasks-3to4),模型为:Qwen/Qwen2.5-3B-Instruct(https://huggingface.co/Qwen/Qwen2.5-3B-Instruct),我们目前不建议用小于 3B 的模型(其他社区多次报告,小于 3B 的模型无法学会推理,经过我们的测试,确实!)
数据集下载方式:
export HF_ENDPOINT=https://hf-mirror.com # 更换为国内镜像源,这个只用执行一次,每次重新打开终端就要重新执行,或者写入 .bashrc

# 下载数据集,替换整个 <xxx> 为你自己的内容
huggingface-cli download --repo-type dataset --resume-download Jiayi-Pan/Countdown-Tasks-3to4 --local-dir <你想要存放的路径,比如:dataset>
模型下载方式,哪个速度快用哪个:
-
方案一,Huggingface 镜像源
# 下载模型,替换整个 <xxx> 为你自己的内容
huggingface-cli download --resume-download Qwen/Qwen2.5-3B-Instruct --local-dir <你想要存放的路径,比如:models>
-
方案二,ModelScope 下载
新建 model_download.py 文件,填入以下内容,替换整个 <xxx>
from modelscope import snapshot_download
model_dir = snapshot_download('Qwen/Qwen2.5-3B-Instruct', cache_dir='<你想要存放的路径,比如:models>', revision='master')
编写配置文件和训练代码
接下来我们需要准备 3 个文件,我们会在 Unlock-DeepSeek(https://github.com/datawhalechina/unlock-deepseek) 项目中提供完整的复现文件,方便同学们直接使用。
-
第一个是 Accelerate 配置文件,用于分布式训练(三张卡)。新建 deepspeed_zero3.yaml 填入以下内容并保存(不是 DeepSeek,别看错!)。
compute_environment: LOCAL_MACHINE
debug: false
deepspeed_config:
  deepspeed_multinode_launcher: standard
  offload_optimizer_device: none
  offload_param_device: none
  zero3_init_flag: true
  zero3_save_16bit_model: true
  zero_stage: 3
distributed_type: DEEPSPEED
downcast_bf16: 'no'
machine_rank: 0
main_training_function: main
mixed_precision: bf16
num_machines: 1
num_processes: 8 # 我们在这里保持常规默认的 8 卡机器,会在后面的启动命令中覆盖新值
rdzv_backend: static
same_network: true
tpu_env: []
tpu_use_cluster: false
tpu_use_sudo: false
use_cpu: false
一般来说,这个文件内容不需要修改,如果有定制需求,请不要使用这个文件,运行 accelerate config 自行设定。
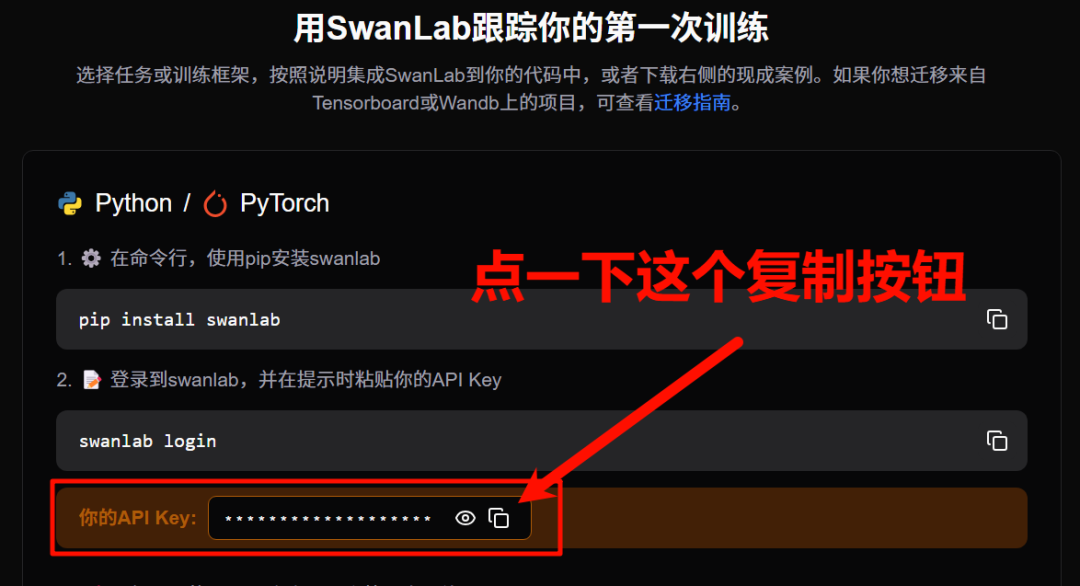
在介绍下一个文件之前,我们强烈建议大家使用 Swanlab(https://swanlab.cn/) 来可视化追踪实验过程,打开:https://swanlab.cn/login ,登录之后点击图中所示的 Quick Start,或者打开:https://swanlab.cn/space/~/settings ,复制 API Key。


-
第二个是 TRL 配置文件,在这里我们会设定训练的超参数。新建 Datawhale-R1.yaml 填入以下内容,并根据实际情况修改(阅读注释),并保存。
# 模型参数
model_name_or_path: <你的模型存放的路径,比如:models/Qwen/Qwen2.5-3B-Instruct>
model_revision: main
torch_dtype: bfloat16
attn_implementation: flash_attention_2
bf16: true
tf32: true
output_dir: <你想要模型输出的路径,比如 output/Datawhale-R1>
# 数据集参数
dataset_id_or_path: <你的数据集存放的路径,比如:dataset>
# Swanlab 训练流程记录参数
swanlab: true # 是否开启 Swanlab
workspace: <用户名>
project: <项目名,整个复现项目的名称,例如:Datawhale-R1-by_xxx>
experiment_name: <实验名,某次超参数运行的自定义名称,例如:qwen2.5-3B-lr:5e-7_beta:0.001>
# 训练参数
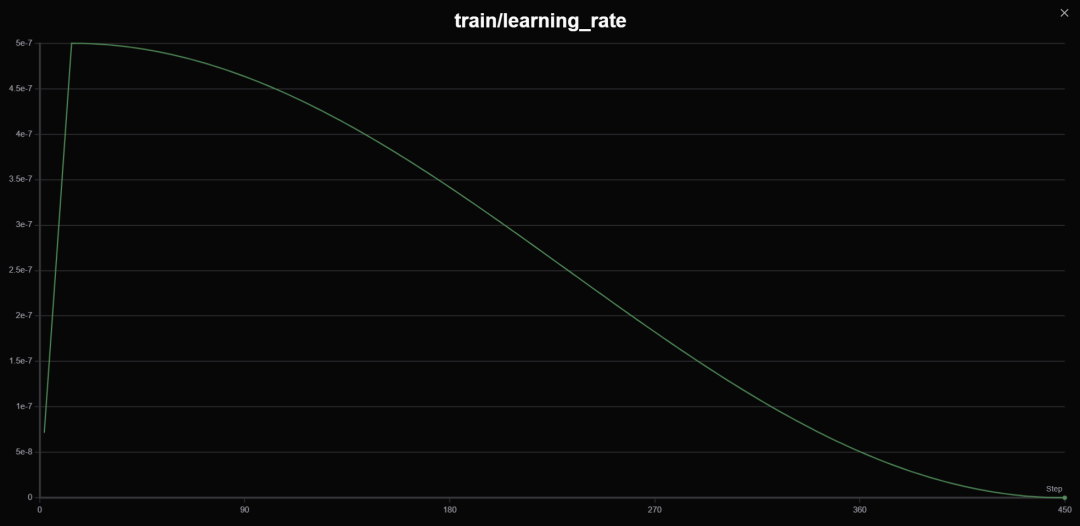
max_steps: 450 # 最大训练步长
per_device_train_batch_size: 1
gradient_accumulation_steps: 8
gradient_checkpointing: true
gradient_checkpointing_kwargs:
use_reentrant: false
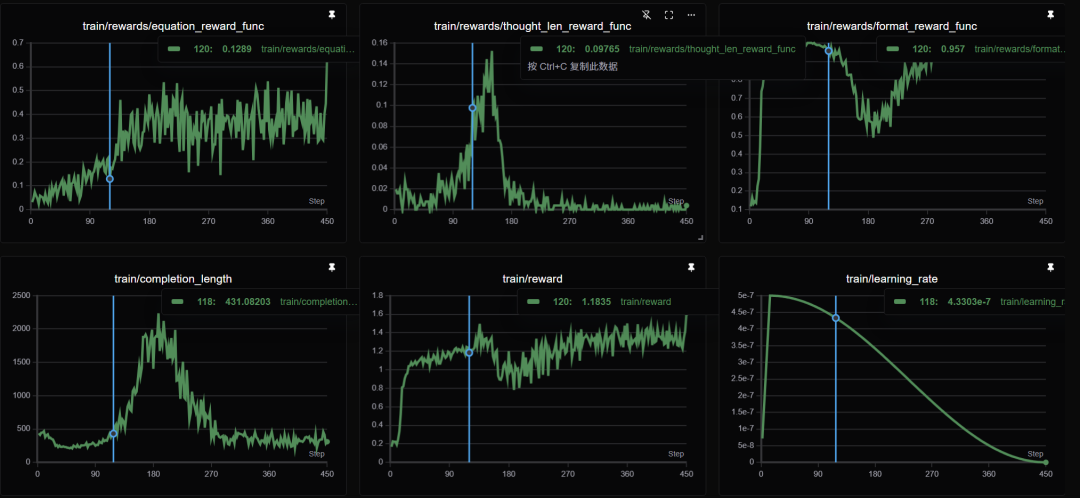
learning_rate: 5.0e-7 # 学习率,调整过,参见下文介绍
lr_scheduler_type: cosine # 学习率衰减方案
warmup_ratio: 0.03 # 学习率预热比率(对于整个步长),好用!
seed: 2025 # 随机种子,方便实验复现
# GRPO 算法参数
beta: 0.001 # KL 惩罚因子,调整过,参见下文介绍
max_prompt_length: 256 # 输入 prompt 最大长度,本实验基本不会有太大变化
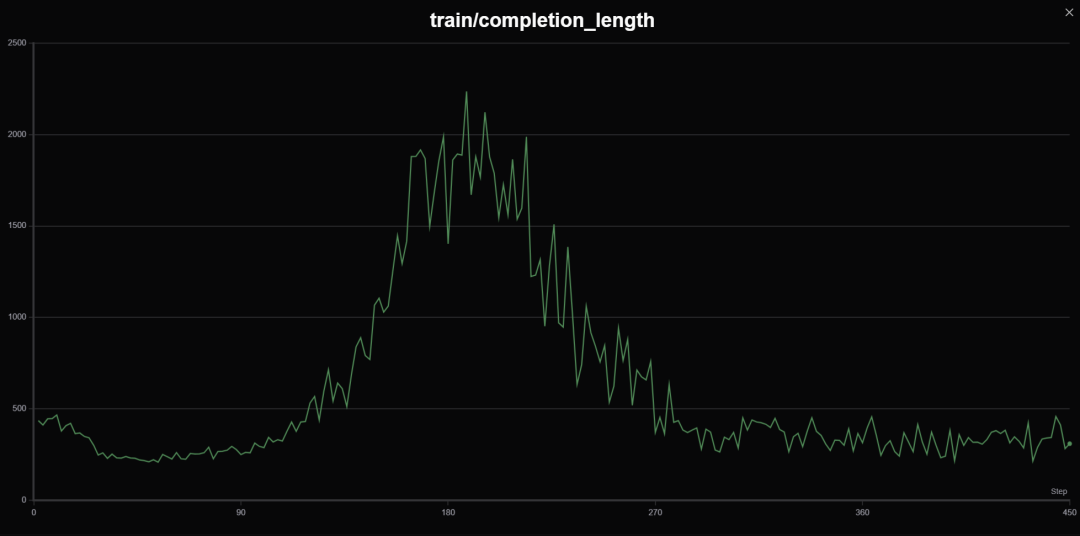
max_completion_length: 4096 # 输出回答长度,包含推理思维链,设为 4K 比较合适
num_generations: 8
use_vllm: true # 启用 vllm 来加速推理
vllm_device: <计算卡编号,例如:cuda:2> # 留出一张卡来启用 vllm 推理,参见下文介绍
vllm_gpu_memory_utilization: 0.5
# Logging arguments
logging_strategy: steps
logging_steps: 1
save_strategy: "steps"
save_steps: 50 # 每隔多少步保存一次
-
learning_rate 和 beta 在 GRPO 的原始论文《DeepSeekMath: Pushing the Limits of Mathematical Reasoning in Open Language Models》(https://arxiv.org/abs/2402.03300)里分别为 1e-6 和 0.04。在这里我们根据《Unraveling RLHF and Its Variants: Progress and Practical Engineering Insights》(https://hijkzzz.notion.site/unraveling-rlhf-and-its-variants-engineering-insights)将其调整为 5e-7 和 0.001。 -
vllm_device 本实验需要留出一张卡作为 vllm 的推理卡,假设我们手上有 3 张卡(编号cuda: 0, cuda: 1, cuda: 2),我们需要指定其中一张卡为 vllm 推理卡,例如我们指定最后一张 cuda:2。另外,如果你使用了CUDA_VISIBLE_DEVICES 情况会有些不一样,比如我们有 8 张卡(编号 cuda:0-7),指定编号为 1、2、3 的卡可见(CUDA_VISIBLE_DEVICES=1,2,3),这时我们想指定最后一张卡为 vllm 推理卡,则是需要设置为 cuda:2,因为设置完可见性后,cuda:1 -> cuda:0,cuda:2 -> cuda:1,cuda:3 -> cuda:2,所以原先的 3 号卡变为了新编号的 2 号卡。 -
save_steps 在 mini-r1(https://www.philschmid.de/mini-deepseek-r1) 中是被设为 25,但是跑完整个训练后,保存的文件大小达到了 700+ GB!因为不仅包含了模型,还包含了其他卡的优化器状态和其他检查点信息,我们在这里改为 50,但仍然要提醒同学们设置成合适自己的大小(训练代码中已经包含结束后保存模型的代码)。 -
最后,就是创建训练代码文件 train_Datawhale-R1.py 并保存,我们几乎给每个关键步骤都添加了注释(建议大家从后往前读),在后文我们会再梳理一遍核心步骤。
import logging
import os
import random
import re
from dataclasses import dataclass
from datetime import datetime
from typing import List
from datasets import load_dataset
from swanlab.integration.transformers import SwanLabCallback
from transformers import AutoTokenizer
from transformers.trainer_utils import get_last_checkpoint
from trl import GRPOConfig, GRPOTrainer, ModelConfig, TrlParser
@dataclass
class DatasetArguments:
"""数据集参数的数据类"""
# 数据集 ID 或路径
dataset_id_or_path: str = "Jiayi-Pan/Countdown-Tasks-3to4"
# 数据集拆分
dataset_splits: str = "train"
# 分词器名称或路径
tokenizer_name_or_path: str = None
@dataclass
class SwanlabArguments:
"""SwanLab参数的数据类"""
# 是否使用 SwanLab
swanlab: bool
# SwanLab 用户名
workspace: str
# SwanLab 的项目名
project: str
# SwanLab 的实验名
experiment_name: str
# 配置日志记录器
logging.basicConfig(level=logging.INFO)
logger = logging.getLogger(__name__)
logger.setLevel(logging.INFO)
handler = logging.StreamHandler()
handler.setFormatter(
logging.Formatter("%(asctime)s - %(name)s - %(levelname)s - %(message)s")
) # 设置日志格式
logger.addHandler(handler)
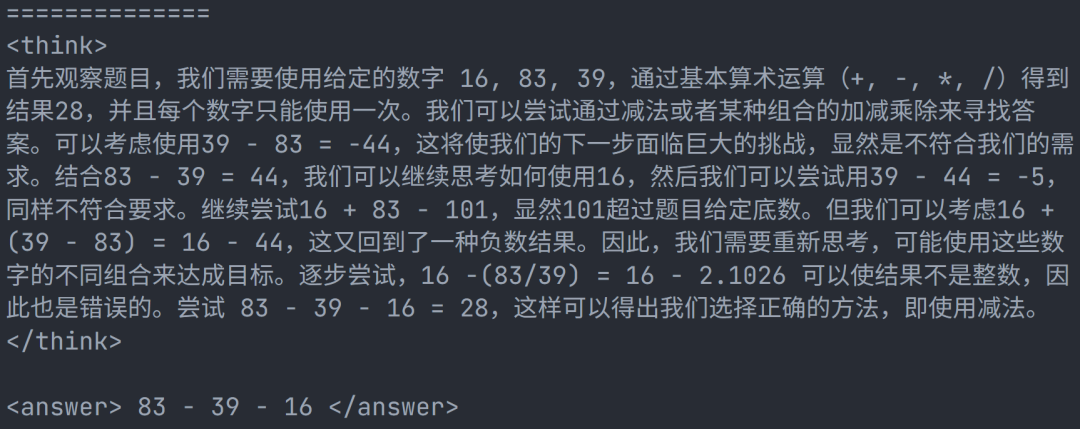
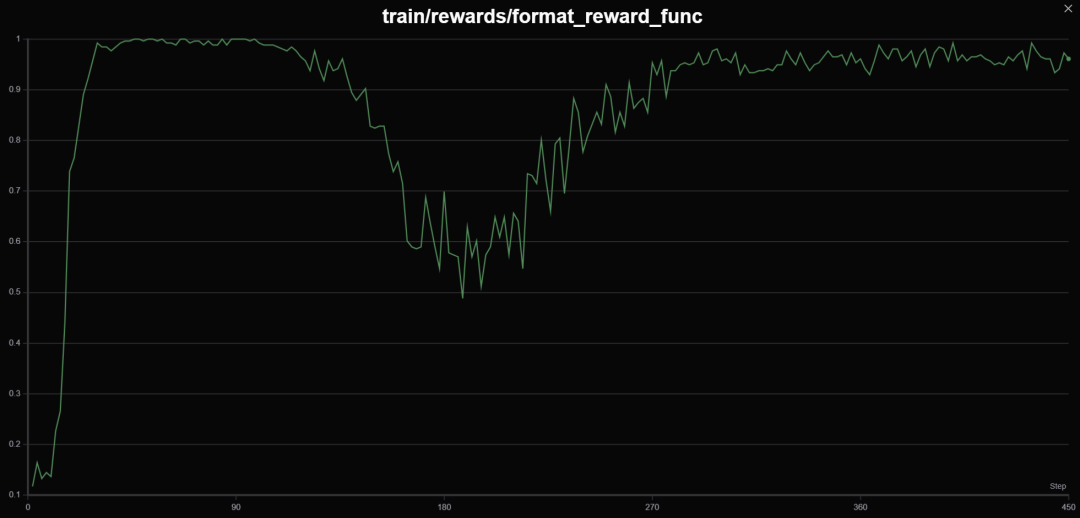
def format_reward_func(completions, **kwargs):
"""
格式奖励函数,检查模型输出格式是否匹配: <think>...</think><answer>...</answer>
参数:
completions (list[str]): 生成的输出
返回:
list[float]: 奖励分数
"""
# 初始化奖励列表
rewards = []
# 遍历生成的输出
for completion in completions:
try:
# 在生成的输出前添加<think>标签,便于后续正则表达式匹配
completion = "<think>" + completion
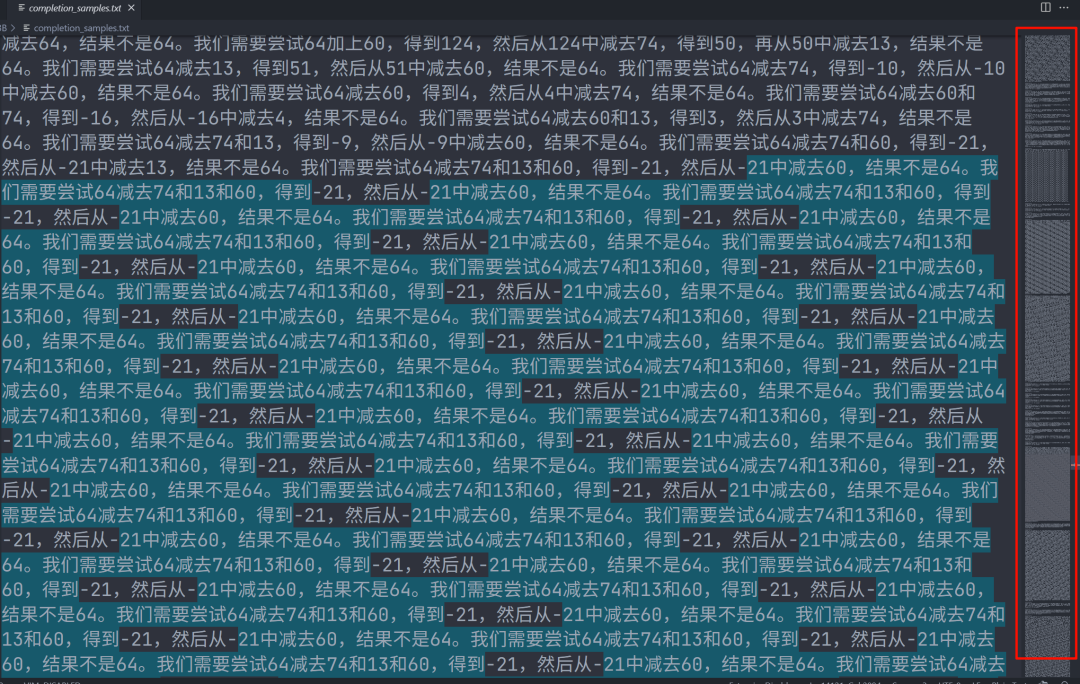
if random.random() < 0.1: # 1% 的概率将生成输出写入文件
# 创建生成输出目录(如果不存在)
os.makedirs("completion_samples", exist_ok=True)
log_file = os.path.join("completion_samples", "completion_samples.txt")
with open(log_file, "a") as f:
f.write(f"\n\n==============\n")
f.write(completion) # 写入生成的输出
# 定义正则表达式模式,用于匹配 <think> 和 <answer> 标签
regex = r"^<think>([^<]*(?:<(?!/?think>)[^<]*)*)<\/think>\n<answer>([\s\S]*?)<\/answer>$"
match = re.search(regex, completion, re.DOTALL) # 使用正则表达式进行匹配
if match is None or len(match.groups()) != 2:
rewards.append(0.0) # 如果格式不正确,奖励为 0
else:
rewards.append(1.0) # 如果格式正确,奖励为 1
except Exception:
rewards.append(0.0) # 如果发生异常,奖励为 0
return rewards
def equation_reward_func(completions, target, nums, **kwargs):
"""
方程奖励函数,检查计算结果是否正确,数字是否符合使用要求(每个数字只用一次,只使用所提供的数字)
参数:
completions (list[str]): 生成的输出
target (list[str]): 预期的答案
nums (list[str]): 可用的数字
返回:
list[float]: 奖励分数
"""
# 初始化奖励列表
rewards = []
# 遍历生成的输出、预期的答案和可用的数字
for completion, gt, numbers in zip(completions, target, nums):
try:
# 在生成的输出前添加 <think> 标签,便于后续正则表达式匹配
completion = "<think>" + completion
# 定义正则表达式模式,用于匹配 <answer> 标签
match = re.search(r"<answer>(.*?)<\/answer>", completion)
if match is None:
rewards.append(0.0) # 如果没有匹配到 <answer> 标签,奖励为 0
continue
equation = match.group(1).strip() # 提取 <answer> 标签中的内容
# 提取方程中的所有数字
used_numbers = [int(n) for n in re.findall(r"\d+", equation)]
# 检查所有数字是否被使用且只使用一次
if sorted(used_numbers) != sorted(numbers):
rewards.append(0.0)
continue
# 定义允许的字符模式,只允许数字、运算符、括号和空白字符
allowed_pattern = r"^[\d+\-*/().\s]+$"
if not re.match(allowed_pattern, equation):
rewards.append(0.0) # 如果方程包含不允许的字符,奖励为 0
continue
# 计算方程的结果
result = eval(equation, {"__builtins__": None}, {})
# 检查方程是否正确且与预期答案匹配(误差小于 1e-5)
if abs(float(result) - float(gt)) < 1e-5:
rewards.append(1.0) # 如果正确,奖励为 1
# 10% 的概率将成功的样本写入文件
if random.random() < 0.10:
# 创建生成输出目录(如果不存在)
os.makedirs("completion_samples", exist_ok=True)
log_file = os.path.join(
"completion_samples", "success_completion_samples.txt"
)
with open(log_file, "a") as f:
f.write(f"\n\n==============\n")
f.write(completion) # 写入生成的输出
else:
rewards.append(0.0) # 如果不正确,奖励为 0
except Exception:
rewards.append(0.0) # 如果评估失败,奖励为 0
return rewards
def thought_len_reward_func(completions, **kwargs):
"""
思考长度奖励函数,检查 <think> 标签的长度是否大于 1000
参数:
completions (list[str]): 生成的输出
返回:
list[float]: 奖励分数
"""
# 初始化奖励列表
rewards = []
# 遍历生成的输出
for completion in completions:
try:
# 在生成的输出前添加 <think> 标签,便于后续正则表达式匹配
completion = "<think>" + completion
# 定义正则表达式模式,用于匹配 <think> 标签
match = re.search(r"<think>(.*?)</think>", completion)
# 如果匹配到 <think> 标签
if match:
thought_process = match.group(1).strip() # 提取 <think> 标签中的内容
thought_length = len(thought_process) # 计算思考过程的长度
if thought_length > 1000:
rewards.append(1.0) # 如果思考过程长度大于 1000,奖励为 1
else:
rewards.append(0.0) # 否则奖励为 0
else:
rewards.append(0.0) # 如果没有匹配到 <think> 标签,奖励为 0
continue
except Exception:
rewards.append(0.0) # 如果发生异常,奖励为 0
return rewards
def get_checkpoint(training_args: GRPOConfig):
"""
获取最后一个检查点
参数:
training_args (GRPOConfig): 训练参数
返回:
str: 最后一个检查点的路径,如果没有检查点,则返回 None
"""
last_checkpoint = None
if os.path.isdir(training_args.output_dir): # 如果输出目录存在
# 获取最后一个检查点
last_checkpoint = get_last_checkpoint(training_args.output_dir)
return last_checkpoint
# 定义 GRPO 训练函数
def grpo_function(
model_args: ModelConfig,
dataset_args: DatasetArguments,
training_args: GRPOConfig,
callbacks: List,
):
# 记录模型参数
logger.info(f"Model parameters {model_args}")
# 记录训练/评估参数
logger.info(f"Training/evaluation parameters {training_args}")
# 加载分词器
tokenizer = AutoTokenizer.from_pretrained(
(
# 如果有指定分词器,则使用指定的分词器,否则使用模型名称
dataset_args.tokenizer_name_or_path
if dataset_args.tokenizer_name_or_path
else model_args.model_name_or_path
),
revision=model_args.model_revision, # 使用指定的模型版本
trust_remote_code=model_args.trust_remote_code, # 允许使用远程代码
)
# 如果分词器没有填充标记,则使用结束标记作为填充标记
if tokenizer.pad_token is None:
tokenizer.pad_token = tokenizer.eos_token
# 加载数据集
dataset = load_dataset(
dataset_args.dataset_id_or_path, split=dataset_args.dataset_splits
)
# 随机选择 50K 个样本,看你喜好定数字,但是数据集有 409K 个样本
dataset = dataset.shuffle(seed=training_args.seed).select(range(50000))
def generate_r1_prompt(numbers, target):
"""
生成 R1 Countdown 游戏提示词
参数:
numbers (list[int]): 数字列表
target (int): 目标值
返回:
dict: 生成的一个数据样本
"""
# 定义提示词前缀
r1_prefix = [
{
"role": "user",
"content": f"使用给定的数字 {numbers},创建一个等于 {target} 的方程。你可以使用基本算术运算(+、-、*、/)一次或多次,但每个数字只能使用一次。在 <think> </think> 标签中展示你的思考过程,并在 <answer> </answer> 标签中返回最终方程,例如 <answer> (1 + 2) / 3 </answer>。在 <think> 标签中逐步思考。",
},
{
"role": "assistant",
"content": "让我们逐步解决这个问题。\n<think>", # 结尾使用 `<think>` 促使模型开始思考
},
]
return {
"prompt": tokenizer.apply_chat_template(
r1_prefix, tokenize=False, continue_final_message=True
), # 提示词,continue_final_message=True 表示将提示词中的最后一个消息继续到最终的输出中
"target": target,
"nums": numbers,
}
# 将数据集转换为 R1 Countdown 游戏提示词
dataset = dataset.map(lambda x: generate_r1_prompt(x["nums"], x["target"]))
# 将数据集拆分为训练集和测试集,拆分比例为 9:1
train_test_split = dataset.train_test_split(test_size=0.1)
train_dataset = train_test_split["train"] # 获取训练集
test_dataset = train_test_split["test"] # 获取测试集
# 设置 GRPOTrainer
trainer = GRPOTrainer(
model=model_args.model_name_or_path, # 模型名称或路径
# 奖励函数列表,用于计算奖励分数
reward_funcs=[
format_reward_func, # 格式奖励函数
equation_reward_func, # 方程奖励函数
thought_len_reward_func, # 思考长度奖励函数
],
args=training_args,
train_dataset=train_dataset,
eval_dataset=test_dataset,
callbacks=callbacks,
)
last_checkpoint = get_checkpoint(training_args) # 检查最后一个检查点
# 如果检测到检查点且指定从检查点恢复训练,则记录信息
if last_checkpoint is not None and training_args.resume_from_checkpoint is None:
logger.info(f"Checkpoint detected, resuming training at {last_checkpoint}.")
logger.info(
f'*** Starting training {datetime.now().strftime("%Y-%m-%d %H:%M:%S")} for {training_args.num_train_epochs} epochs***'
)
# 训练模型
train_result = trainer.train(resume_from_checkpoint=last_checkpoint)
# 记录和保存指标
metrics = train_result.metrics
metrics["train_samples"] = len(train_dataset)
trainer.log_metrics("train", metrics)
trainer.save_metrics("train", metrics)
trainer.save_state()
logger.info("*** Training complete ***")
# 保存模型和分词器
logger.info("*** Save model ***")
trainer.model.config.use_cache = True
trainer.save_model(training_args.output_dir)
logger.info(f"Model saved to {training_args.output_dir}")
training_args.distributed_state.wait_for_everyone() # 等待所有进程加载
tokenizer.save_pretrained(training_args.output_dir)
logger.info(f"Tokenizer saved to {training_args.output_dir}")
logger.info("*** Training complete! ***")
def main():
"""主函数,用于执行主训练循环"""
# 解析命令行参数和配置文件
parser = TrlParser((ModelConfig, DatasetArguments, GRPOConfig, SwanlabArguments))
model_args, dataset_args, training_args, swanlab_args = (
parser.parse_args_and_config()
)
# 如果使用 SwanLab,则创建 SwanLab 回调对象,用于训练信息记录
if swanlab_args.swanlab:
swanlab_callback = SwanLabCallback(
workspace=swanlab_args.workspace,
project=swanlab_args.project,
experiment_name=swanlab_args.experiment_name,
)
callbacks = [swanlab_callback]
else:
callbacks = None
# 运行主训练循环
grpo_function(model_args, dataset_args, training_args, callbacks=callbacks)
if __name__ == "__main__":
main()
启动训练
# 如果你要限制计算卡编号,请在这里设置,例如只使用 cuda:1-3,如果不用限制,就删除下面这行
export CUDA_VISIBLE_DEVICES=1,2,3

accelerate launch \
    --num_processes 2 \
    --config_file deepspeed_zero3.yaml \
    train_Datawhale-R1.py \
    --config Datawhale-R1.yaml
训练流程详解
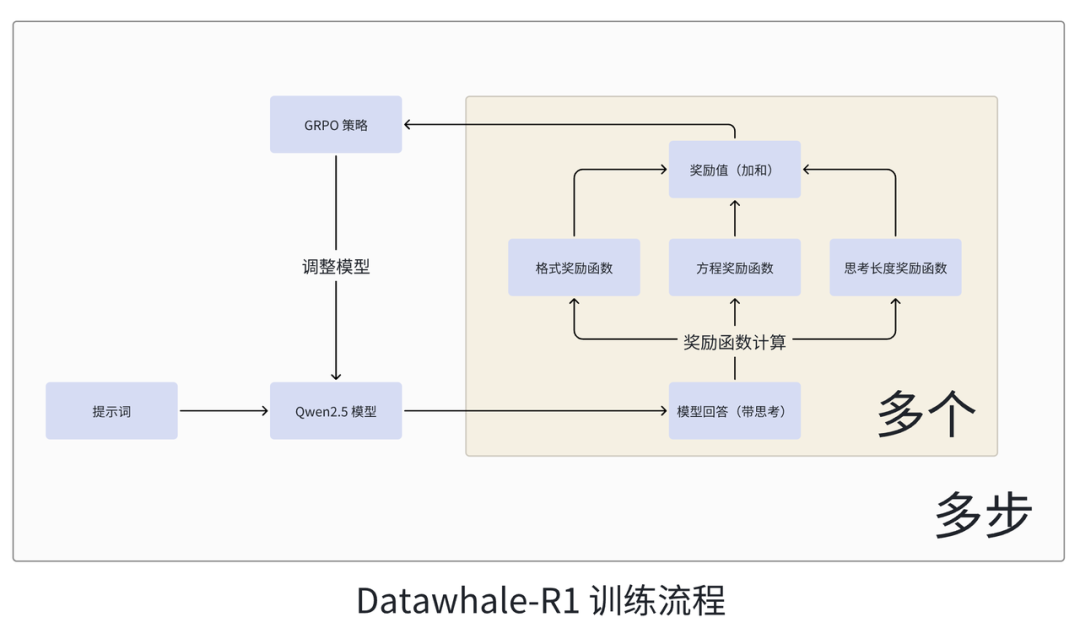
流程总览
-
将提示词输入到 Qwen 2.5 模型。 -
Qwen 2.5 输出多个带思考的回答(本实验设置为 8,由 num_generations 参数决定)。 -
模型的回答分别传入三个奖励函数计算,计算的结果相加。 -
将奖励值传入 GRPO 策略中,GRPO 根据奖励值来决定如何调整 Qwen 2.5 模型。 -
重复上述流程(本实验重复了 450 次,由 max_steps 参数决定)。
-
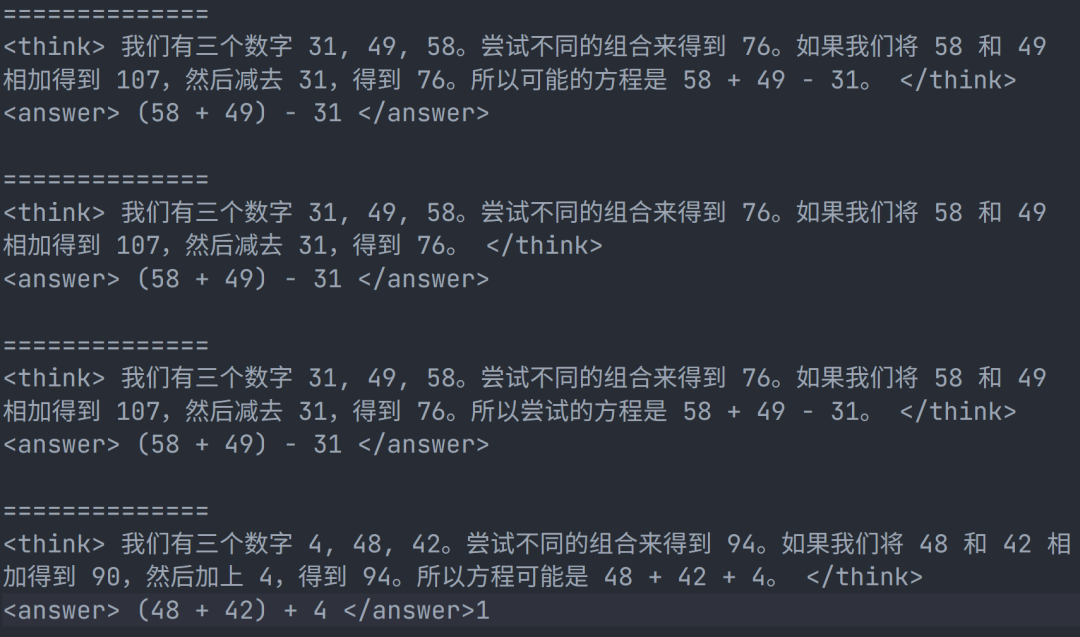
检查答题格式是否规范(格式奖励函数) -
解题结果是否正确(方程奖励函数) -
解题步骤是否详细(思考长度奖励函数)
核心代码介绍
parser = TrlParser((ModelConfig, DatasetArguments, GRPOConfig, SwanlabArguments))
model_args, dataset_args, training_args, swanlab_args = (
    parser.parse_args_and_config()
)
# train_Datawhale-R1.py

@dataclass
class SwanlabArguments:
    """SwanLab参数的数据类"""

    # 是否使用 SwanLab
    swanlab: bool
    # SwanLab 用户名
    workspace: str
    # SwanLab 的项目名
    project: str
    # SwanLab 的实验名
    experiment_name: str
# Datawhale-R1.yaml

# Swanlab 训练流程记录参数
swanlab: true # 是否开启 Swanlab
workspace: <用户名>
project: <项目名,整个复现项目的名称,例如:Datawhale-R1-by_xxx>
experiment_name: <实验名,某次超参数运行的自定义名称,例如:qwen2.5-3B-lr:5e-7_beta:0.001>
r1_prefix = [
    {
        "role": "user",
        "content": f"使用给定的数字 {numbers},创建一个等于 {target} 的方程。你可以使用基本算术运算(+、-、*、/)一次或多次,但每个数字只能使用一次。在 <think> </think> 标签中展示你的思考过程,并在 <answer> </answer> 标签中返回最终方程,例如 <answer> (1 + 2) / 3 </answer>。在 <think> 标签中逐步思考。",
    },
    {
        "role": "assistant",
        "content": "让我们逐步解决这个问题。\n<think>",  # 结尾使用 `<think>` 促使模型开始思考
    },
]
return {
    "prompt": tokenizer.apply_chat_template(
        r1_prefix, tokenize=False, continue_final_message=True
    ),  # 提示词,continue_final_message=True 表示将提示词中的最后一个消息继续到最终的输出中
    "target": target,
    "nums": numbers,
}
# 将数据集转换为 R1 Countdown 游戏提示词
dataset = dataset.map(lambda x: generate_r1_prompt(x["nums"], x["target"]))

# 举例
nums = [44, 19, 35]
target = 98
r1_prefix = {
    "role": "user",
    "content": f"使用给定的数字 [44, 19, 35],创建一个等于 98 的方程。你可以使用基本算术运算(+、-、*、/)一次或多次,但每个数字只能使用一次。在 <think> </think> 标签中展示你的思考过程,并在 <answer> </answer> 标签中返回最终方程,例如 <answer> (1 + 2) / 3 </answer>。在 <think> 标签中逐步思考。",
},
{
    "role": "assistant",
    "content": "让我们逐步解决这个问题。\n<think>",  # 结尾使用 `<think>` 促使模型开始思考
},

# 转换为 Qwen 提示词模版后
prompt = "<|im_start|>system\nYou are Qwen, created by Alibaba Cloud. You are a helpful assistant.<|im_end|>\n<|im_start|>user\n使用给定的数字 [44, 19, 35],创建一个等于 98 的方程。你可以使用基本算术运算(+、-、*、/)一次或多次,但每个数字只能使用一次。在 <think> </think> 标签中展示你的思考过程,并在 <answer> </answer> 标签中返回最终方程,例如 <answer> (1 + 2) / 3 </answer>。在 <think> 标签中逐步思考。<|im_end|>\n<|im_start|>assistant\n让我们逐步解决这个问题。\n<think>" # 模型将在 \n<think> 后续写
def equation_reward_func(completions, target, nums, **kwargs):
    """
    参数:
        completions (list[str]): 生成的输出
        target (list[str]): 预期的答案
        nums (list[str]): 可用的数字

    返回:
        list[float]: 奖励分数
    """
    # 初始化奖励列表
    rewards = []
    # 遍历生成的输出、预期的答案和可用的数字
    for completion, gt, numbers in zip(completions, target, nums):
        ... # 进行一些 rewards.append() 操作
    return rewards
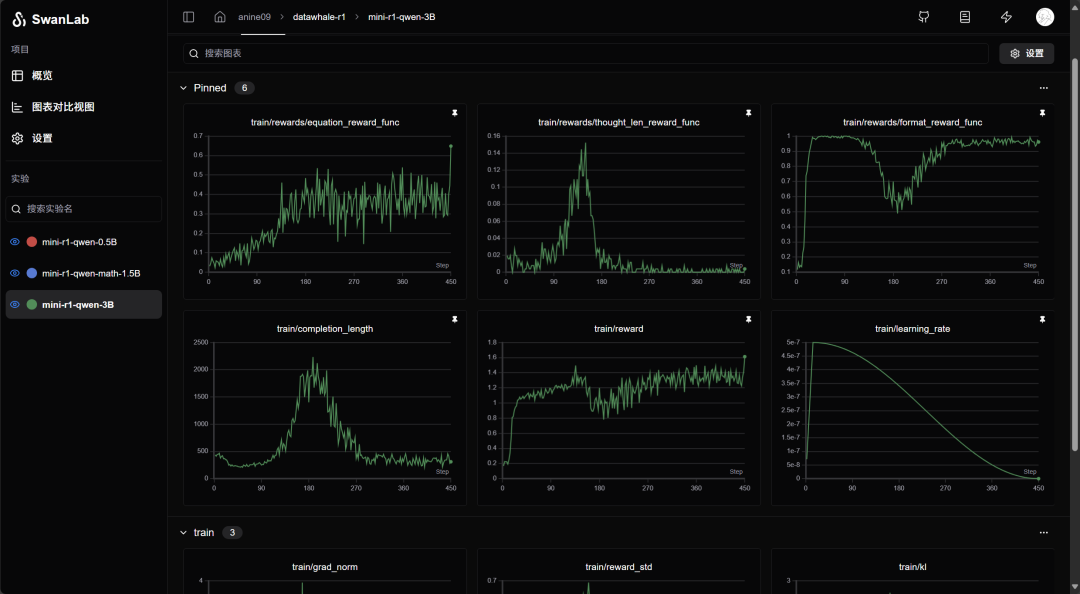
训练结果解读


展望
-
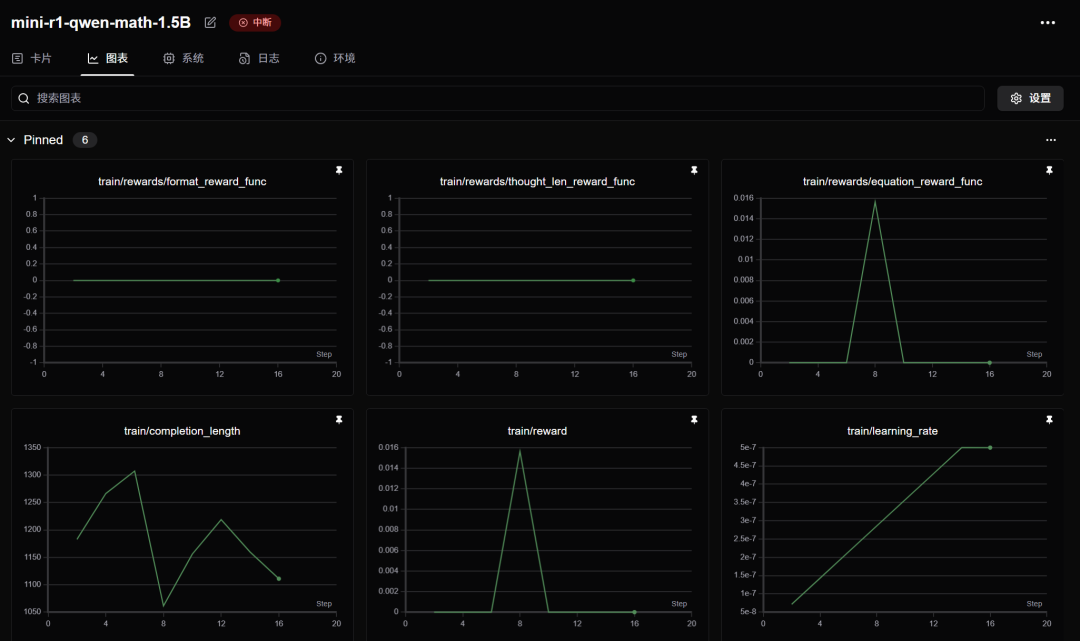
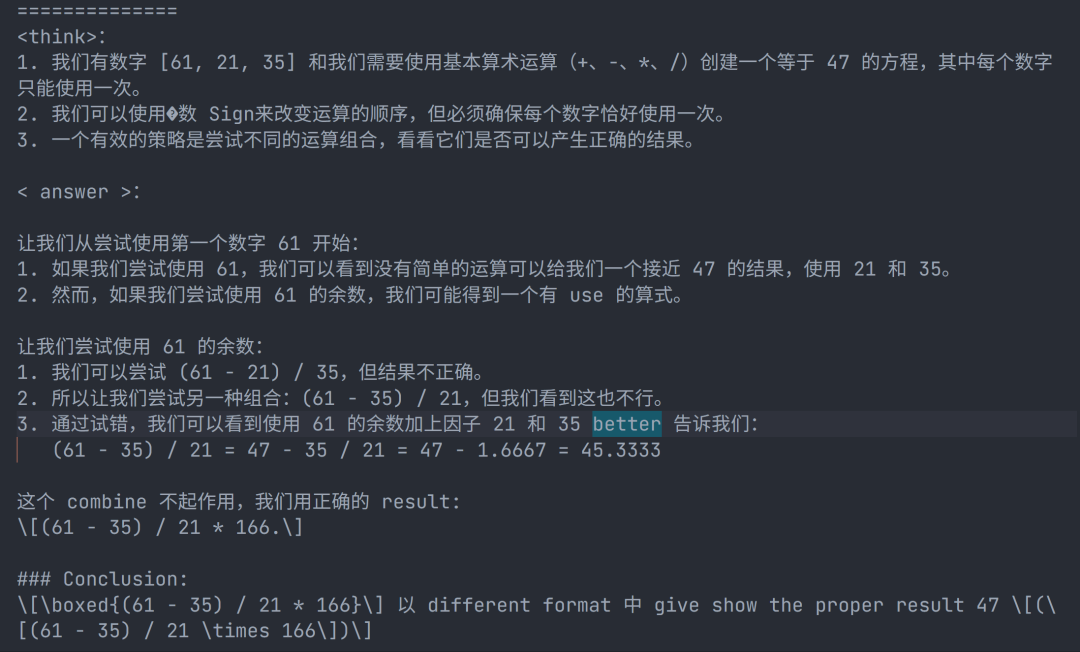
Math 模型不太好用,它有固有的数学输出会影响格式奖励,可能需要更长的步长才能纠正,不环保,训了一会我就停了。
-
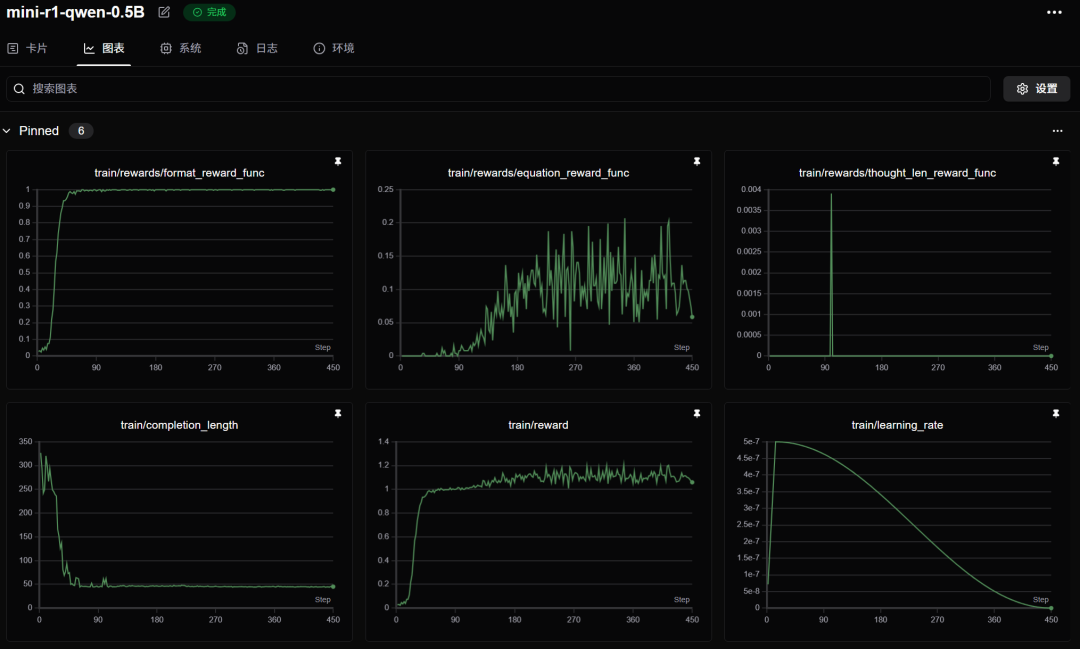
小于 3B 的模型真不好用,没什么必要再试验了,DeepSeek 官方蒸馏的 1.5B 的推理也很烂,小模型承受了太多它不该承受的东西。我们甚至还在 0.5B 的模型看到了俄语,但是找不到图了。
-
这种训练方式用来规范模型输出格式特别好用。 -
Jian Hu 报告 GRPO 有严重震荡问题(https://zhuanlan.zhihu.com/p/14888098807),或许大家可以试试其他算法。 -
如果你的资源充足,可以试试更大的模型,希望在开源社区能够见到大家的新发现。 -
TRL 目前的 LoRA 模块有严重 Bug,请不要使用。 -
最后一点,要复现,请用 TinyZero,省钱!
完整文件获取

(文:Datawhale)