作者:Bruce
原文:https://zhuanlan.zhihu.com/p/17186885141

前言
笔者一直想找个开源的推理引擎框架学习一下源代码,机缘巧合认识了 sglang 社区的朋友,于是也参与了一些sglang的code walk through。本文从我个人角度,解析一下sglang kv cache 管理相关的源码部分。
对于今后想要学习sglang的同学,首先强烈建议先阅读 flashinfer[1] 的论文,flashinfer 作为sglang的默认后端,从中可以了解一些底层的设计思路。另外,建议阅读 code walk through[2](还在紧锣密鼓的进行),大家有兴趣也可以参与进来。下图即引用自社区。
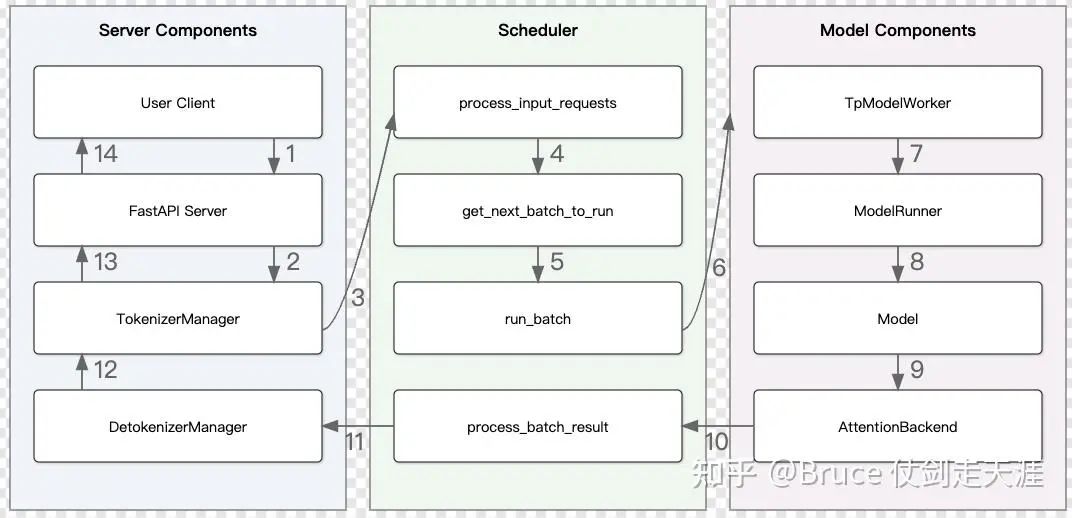
而本文则主要关注于kvcache 管理这一层,但由于kvcache 是全局资源,与其交互过程是遍布全流程的,所以也必须理解请求,batch,scheduler的行为。如果懒得看,可以直接看文章末尾At Last的总结。
sglang的kv cache 管理相关模块
首先为了方便翻阅,我们列出相关目录。
最直接的cache 类实现在 python/sglang/srt/mem_cache[3],包含两大类结构,基于BasePrefixCache的类(chunked cache,radix cache)以及memory_pool。前者大家都有直接的印象,就是kvcache,后者则是管理映射关系,主要有两类映射:reqtotoken,tokentokv。前者是请求和生成token的映射关系,后者是token和kvcache的映射关系,由于kvcache真实操作的差异,也包括MHA,MLA,double sparsity的实现。
为了方便大家理解,我们也必须了解核心的调度层数据结构,上层结构基本都在manager层,代码目录 python/sglang/srt/managers[4],这是一个完整的LLM serving框架,包括tokenizer/detokenizer,session 管理,scheduler等,kvcache的核心涉及角色是scheduler以及tp_worker。sglang中对于执行逻辑的抽象关系,有过说明:
The following is the flow of data structures for a batch:

ScheduleBatch -> ModelWorkerBatch -> ForwardBatch

- ScheduleBatch is managed by `scheduler.py::Scheduler`.
  It contains high-level scheduling data. Most of the data is on the CPU.
- ModelWorkerBatch is managed by `tp_worker.py::TpModelWorker`.
  It is a subset of `ScheduleBatch` that only contains data related to the model forward on GPU.
  It will be transformed from CPU scheduler to GPU model runner.
- ForwardBatch is managed by `model_runner.py::ModelRunner`.
  It contains low-level tensor data. Most of the data consists of GPU tensors.
上述中,forward batch即在model_executor,是底层抽象,往上是ModelWorkerBatch(位于tp_worker),再往上是ScheduleBatch(位于scheduler)。理解了batch的流动以及req,kvcache,batch的关系,就基本可以理解kvcache在这三层之间的关系。
接下来,是推理核心实现之一,model_executor。目录位于python/sglang/srt/model_executor[5], 具体的forward 前的调度和处理工作集中在model_runner,包括sampling、rope,cuda_graph,kv_cache 的选择和配置等等,通过forward_batch_info.py 我们可以看到sglang除支持常规的prefill、decode、prefill with prefix cache外,也支持了投机推理。
最后,即是真正的后端,位于python/sglang/srt/layers[6]和flahsinfer[7],这里会对kv cache进行实际操作进行attention的计算。是真正的核心实现之一。
原则上完整的推理栈还会经过model,但是sglang中model 对具体的kvcache 操作不感知,故不特别分析了。为了解释方便,我们先以传统的MHA路径进行分析,MLA和doubleSparsity后续再找机会单独分析。
最后,由于内容实在太多,所以有关真正的后端flashinfer以及attentionbackend、cudagraph runner的实现,我们会放到下篇来继续,本篇集中在model_executor和scheduler 这一层。
KV Cache 基础类
首先是最基础的数据结构ReqToTokenPool与BaseTokenToKVPool,为了语意完整,我们直接看ReqToTokenPool和MHATokenToKVPool。
ReqToTokenPool
ReqToTokenPool 核心数据结构就是free_slots以及req_to_token_pool。req_to_token_pool 是一个两维数组,size指请求容量,max_context_len指一个请求的最大token 数量,这就一目了然了。该数据结构对外提供的功能就是通过free_slots对请求所需资源进行分配和释放,通过req_to_token_pool 进行对req-token映射的记录。
self.req_to_token = torch.zeros(
            (size, max_context_len), dtype=torch.int32, device=device
        )
self.free_slots = list(range(size))
此外,对映射内容的修改,通过write接口实现,该接口被schedule 上层调用。
def write_without_records(self, indices, values):
     self.req_to_token[indices] = values
MHATokenToKVPool(BaseTokenToKVPool)
以MHA的class 为例, 这里的核心数据结构如下
free_slots:与ReqToTokenPool 一样,分配空闲slot用的,尺寸不同,是token的数量
free_groups:可以理解为free_slot的小数组,目的是批量释放slot,最终free_group里的slot会回到free_slots
k_buffers,v_buffers:kv buffer。不同的算法,kvcache的管理可能不同,比如MHA和MLA是不同的。但一维都是layer,是统一的
如下的格式,相信大家都比较好理解。
self.k_buffer = [
            torch.empty(
                (self.size + 1, self.head_num, self.head_dim),
                dtype=self.store_dtype,
                device=self.device,
            )
            for _ in range(self.layer_num)
        ]
        self.v_buffer = [
            torch.empty(
                (self.size + 1, self.head_num, self.head_dim),
                dtype=self.store_dtype,
                device=self.device,
            )
            for _ in range(self.layer_num)
        ]
但是我们还需要注意下面的类型转换,存储类型不支持float8_e5m2,会转成uint8.
self.dtype = dtype
if dtype == torch.float8_e5m2:
    # NOTE: Store as torch.uint8 because Tensor index_put is not implemented for torch.float8_e5m2
    self.store_dtype = torch.uint8
else:
    self.store_dtype = dtype
在attentionbackend的部分,会有许多对kv cache的set/get操作,而上层几乎只对free_slots进行free/alloc的操作,起到一个资源分配的作用。
现在我们可以看一下Cache类了,为了说明简单,我们只介绍chunkedCache。有关radix Cache 我们会后面单独介绍。
ChunkCache
sglang 支持prefixCache,所以默认的基础类就支持prefix的共用,chunkCache是BasePrefixCache的子类。
关键数据结构如下,首先是Entry的成员,rid是request id的缩写,value是token indice的数组。
class ChunkCacheEntry:
    def __init__(self, rid, value):
        self.rid = rid
        self.value = value


class ChunkCache(BasePrefixCache):
    def __init__(
        self, req_to_token_pool: ReqToTokenPool, token_to_kv_pool: BaseTokenToKVPool
    ):
        self.disable = True
        self.req_to_token_pool = req_to_token_pool
        self.token_to_kv_pool = token_to_kv_pool

        self.reset()

    def reset(self):
        self.entries = {}
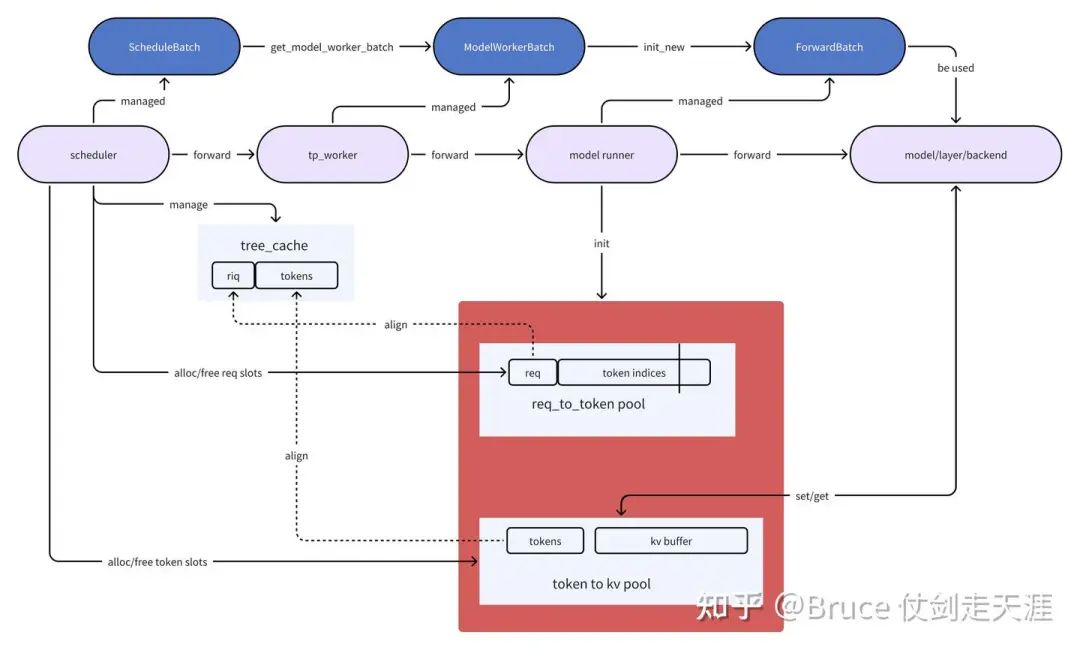
用一张图简单理解cache entries,req_to_token_pool与token_to_kv_pool,kv cache的关系。
此外,Cache类 还有三个比较重要的接口函数(其他接口函数介绍radix cache再介绍)。
@abstractmethod
def match_prefix(self, **kwargs) -> Tuple[List[int], int]:
    pass

@abstractmethod
def cache_finished_req(self, **kwargs):
    pass

@abstractmethod
def cache_unfinished_req(self, **kwargs):
    pass
match_prefix 就是前缀匹配,cache_unfinished_req即cache数据到cache entry中,cache_finished_req主要是从cache中清除相关信息(为什么取这个名字有点纳闷)。上述三个接口都将在schedule中被使用。
RadixCache
我们之所以看这个数据结构,主要是由于schedulePocily 使用了这个结构,用于安排调度的优先级。知道radixTree的朋友,看见这个名字应该猜的出来。RadixCache 与chunkCache 不同的点在于,chunkCache 管理Cache 是用的字典结构,radixCache 则使用radixtree 来管理。实际上就是管理前缀,这里最大的变化在于前缀匹配的实现(match_prefix)。对于chunkCache来说,prefix match是取entry.value 前max_prefix_len的值;对于radixCache来说,这是一个前缀树匹配的操作。match_prefix 的用处在于利用公共前缀的kvcache,减少prefill的开销,radixCache在前缀匹配的准确性上相比chunkCache 还是靠谱很多的,所以也更有可能达到减少prefill 开销的目的。
数据结构上radixCache如下,可见区别主要就是多了radixtree相关的结构。
self.req_to_token_pool = req_to_token_pool
self.token_to_kv_pool = token_to_kv_pool
self.disable = disable
self.root_node = TreeNode()
self.root_node.key = []
self.root_node.value = []
self.root_node.lock_ref = 1
self.evictable_size_ = 0
此外,radixTree作为一种便于高效检索和插入的数据结构,在调度中也会用到。这里特别介绍一个radix 独有实现的接口
def evict(self, num_tokens: int, evict_callback: Callable):
这是一个清资源的接口,这个的意思是,从cache 中清掉num_tokens个数的entry,并且调用evict_callback清空资源
注意,这个函数有两个退出条件:1. 清理出来了num_tokens的显存;2. 已经没有可清理的token
注意,对于正在使用的显存,不会清理(通过ref)判断
调度基础类
SchedulePolicy
如下可以看到schedulePolicy里默认使用了RadixCache作为waiting_queue_radix_tree用于任务调度。sglang 支持两种调度策略:CacheAwarePolicy即缓存感知的调度策略,CacheAgnosticPolicy 不感知缓存的策略,这里的缓存指的就是treecache。各自又有几种策略,比如最长匹配,带权重的深度优先搜索,最长输出等等,主要用于给waiting queue排序,waiting queue就是待处理的请求队列。
class CacheAwarePolicy(Enum):
    """Scheduling policies that are aware of the tree cache."""

    LPM = "lpm"  # longest prefix match
    DFS_WEIGHT = "dfs-weight"  # depth-first search weighting


class CacheAgnosticPolicy(Enum):
    """Scheduling policies that are not aware of the tree cache."""

    FCFS = "fcfs"  # first come first serve
    LOF = "lof"  # longest output first
    RANDOM = "random"


class SchedulePolicy:
    Policy = Union[CacheAwarePolicy, CacheAgnosticPolicy]

    def __init__(self, policy: str, tree_cache: BasePrefixCache):
        self.policy = self._validate_and_adjust_policy(policy, tree_cache)
        self.tree_cache = tree_cache

        # It is used to find the matching prefix for in-batch prefix caching.
        self.waiting_queue_radix_tree = RadixCache(
            req_to_token_pool=None, token_to_kv_pool=None, disable=False
        )
schedulePolicy这个类最重要的接口函数是calc_priority,具体细节后面补充吧,可以看到下面的代码,根据配置和waiting queue的请求情况,进行排序,如果是FCFS就不用重排序了。
def calc_priority(self, waiting_queue: List[Req]) -> bool:
      policy = self._determine_active_policy(waiting_queue)

      prefix_computed = False
      if isinstance(policy, CacheAwarePolicy):
          prefix_computed = True
          temporary_deprioritized = self._compute_prefix_matches(
              waiting_queue, policy
          )
          if policy == CacheAwarePolicy.LPM:
              SchedulePolicy._sort_by_longest_prefix(
                  waiting_queue, temporary_deprioritized
              )
          elif policy == CacheAwarePolicy.DFS_WEIGHT:
              SchedulePolicy._sort_by_dfs_weight(waiting_queue, self.tree_cache)
          else:
              raise ValueError(f"Unknown CacheAware Policy: {policy=}")
      else:
          if policy == CacheAgnosticPolicy.FCFS:
              pass
          elif policy == CacheAgnosticPolicy.LOF:
              SchedulePolicy._sort_by_longest_output(waiting_queue)
          elif policy == CacheAgnosticPolicy.RANDOM:
              SchedulePolicy._sort_randomly(waiting_queue)
          else:
              raise ValueError(f"Unknown CacheAgnostic Policy: {policy=}")

      return prefix_computed
当然了这里有一些细节的优化,有兴趣可以仔细阅读这部分代码,我这里提两个:
_determine_active_policy 中如果发现等待队列太长且默认采用的是LPM(最长前缀匹配),则换成FCFS。但如果是dfs-weight则不影响,本质还是计算成本的权衡。
def _determine_active_policy(self, waiting_queue: List[Req]) -> Policy:
        if len(waiting_queue) > 128 and self.policy == CacheAwarePolicy.LPM:
            # Turn off the expensive prefix matching and sorting when the #queue is large.
            return CacheAgnosticPolicy.FCFS
        return self.policy
_compute_prefix_matches 有一种提高缓存命中率的策略in-batch prefix caching。如果当前batch(waiting queue)中,有不少请求有同一个前缀,而且前缀在已有cache中仅匹配了一小部分(<IN_BATCH_PREFIX_CACHING_CHECK_THRESHOLD),为了提高整体的cache hit rate,仅优先调度前几个请求(<IN_BATCH_PREFIX_CACHING_DEPRIORITIZE_THRESHOLD),其他会被放到waiting queue的尾端。
# NOTE(sang): This logic is for in-batch prefix caching;
# If there are more than 1 request that have small matching prefix from
# existing cache, but all those requests share the same prefix, we prefer
# to schedule only one of them so that we can increase the cache hit rate.
# We prefer to set IN_BATCH_PREFIX_CACHING_CHECK_THRESHOLD > 0 because too small
# threshold means we cannot use in-batch prefix caching for short prefixes.
# It is kind of common when the engine is long running (e.g., imagine the prefix "the").
PrefillAdder
第二个和调度相关的类是PrefillAdder,它决定了还能不能插入新请求,其返回有三种,语义很字面直白。
class AddReqResult(Enum):
    CONTINUE = auto()  # Continue to add requests
    NO_TOKEN = auto()  # No token left
    OTHER = auto()  # Other reasons to stop adding requests
PrefillAdder核心数据结构如下,关键是rem_total_tokens,rem_input_tokens,rem_chunk_tokens。他们的区别是:
-
• rem_total_tokens 包括prefill和decoding 一共的上下文长度 -
• rem_input_tokens 则只包括prefill 的输入 -
• rem_chunk_tokens 则是一个chunk可以包含的token数
## in python/sglang/srt/managers/schedule_policy.py
class PrefillAdder:
    def __init__(
        self,
        tree_cache: BasePrefixCache,
        running_batch: ScheduleBatch,
        new_token_ratio: float,
        rem_total_tokens: int,
        rem_input_tokens: int,
        rem_chunk_tokens: Optional[int],
        mixed_with_decode_tokens: int = 0,
    ):
        self.tree_cache = tree_cache
        self.running_batch = running_batch
        self.new_token_ratio = new_token_ratio
        self.rem_total_tokens = rem_total_tokens - mixed_with_decode_tokens
        self.rem_input_tokens = rem_input_tokens - mixed_with_decode_tokens
        self.rem_chunk_tokens = rem_chunk_tokens
        if self.rem_chunk_tokens is not None:
            self.rem_chunk_tokens -= mixed_with_decode_tokens

        self.cur_rem_tokens = rem_total_tokens - mixed_with_decode_tokens

        self.req_states = None
        self.can_run_list = []
        self.new_being_chunked_req = None
        self.log_hit_tokens = 0
        self.log_input_tokens = 0
我们可以用一个简单的接口函数,来体会返回状态和这几个关键变量的关系,如下函数是add_one_req 请求的最后一个环节,用来最终判断是否可以插入请求。
def budget_state(self):
    if self.rem_total_tokens <= 0 or self.cur_rem_tokens <= 0:
        return AddReqResult.NO_TOKEN

    if self.rem_input_tokens <= 0 or (
        self.rem_chunk_tokens is not None and self.rem_chunk_tokens <= 0
    ):
        return AddReqResult.OTHER

    return AddReqResult.CONTINUE
当然,判断返回的地方不只这个函数,具体可以阅读PrefillAdder add_one_req源码理解。对于理解kvcache 管理,目前这点可能就够了。最后,可以被插入的请求都会放在can_run_list这个列表中。
Req
Req 是核心请求类,包括判断请求是否可以结束,以及核心的数据结构。在介绍req 核心结构前,先简单看看几种finish reason。
FINISH_MATCHED_TOKEN # 匹配了终止的token,比如tokenizer,sampler,scheduler 等设置的eos token
FINISH_MATCHED_STR   # 匹配了终止的字符串,一般是sampler设置的
FINISH_LENGTH        # 匹配了最大输出长度
FINISH_ABORT         # 由于其他原因终止,比如请求不合法等等
req 核心成员变量较多,但为了理解调度,我们有必要过一些。为了方便分析,分为几段介绍。首先是输入输出信息,也是最重要的。
# Input and output info
self.rid = rid                                               #请求id, chunkedCache entry的key
self.origin_input_text = origin_input_text                   #原始请求输入文本字符串
self.origin_input_ids_unpadded = (                           #原始请求输入token list
            origin_input_ids_unpadded
            if origin_input_ids_unpadded
            else origin_input_ids  # Before image padding
        )
self.origin_input_ids = origin_input_ids                     #也是原始请求输入,但可能是padding过后的。
                                                             #通常和origin_input_ids_unpadded一样
                                                             #在image input下,sglang对输入做额外的padding,则有区别
self.output_ids = []  # Each decode stage's output ids       #输出token list
self.fill_ids = None  # fill_ids = origin_input_ids + output_ids # 完整的上下文token list
self.session_id = session_id                                 # 会话id,一轮用户会话可能有多个请求
self.input_embeds = input_embeds                             # embedding 化后的输入

# Memory pool info
self.req_pool_idx = None                                     #对于req_token_pool的索引
其次是用于判断结束的成员变量
# Check finish
self.tokenizer = None                           # tokenizer,可以用于eos等stop token判断
self.finished_reason = None                     # 结束理由
self.to_abort = False                           # 是否是finished_abort
self.stream = stream                            # 是否是流式的请求
self.eos_token_ids = eos_token_ids              # eos token list,用于结束判断
然后是用于推理的成员变量
# For incremental decoding
# ----- | --------- read_ids -------|
# ----- |   surr_ids  |
# xxxxx | xxxxxxxxxxx | xxxxxxxxxxx |
# ----- ^ ----------- ^ ----------- ^
# ----- 1 ----------- 2 ----------- 3
# 1: surr_offset
# 2: read_offset
# 3: last token
self.surr_offset = None  # Surrounding offset to defeat the cleanup algorithm
self.read_offset = None
# 上图已经说明了surr_offset和read_offset的区别
# surr_offset通常记录上一次处理到的位置,read_offset 说明正在处理的位置
self.decoded_text = ""   # 解码的输出

# Prefix info,与共享prefix 的kvcache 有关
self.prefix_indices = []
# Tokens to run prefill. input_tokens - shared_prefix_tokens.
self.extend_input_len = 0
self.last_node = None

# Chunked prefill
self.is_being_chunked = 0

# The number of cached tokens, that were already cached in the KV cache
# cached的tokens
self.cached_tokens = 0

self.vid = 0  # version id to sync decode status with in detokenizer_manager
              # 只有jumpforward 会对其进行修改,同步detokenizer的状态

# For retraction  # 用于撤回类似的功能,即需要回退decode 的输出
self.is_retracted = False

# Constrained decoding, 一般用于类似json的结构化输出
self.grammar: Optional[BaseGrammarObject] = None

# Sampling info
self.sampling_params = sampling_params
self.lora_path = lora_path

#剩下一众logits 相关的,为了方便大家理解源码,我这里也介绍
self.return_logprob # 是否有必要返回logits
self.logprob_start_len # 从哪个位置开始算logits
self.extend_logprob_start_len  #, extend_即extend的部分开始算,简单理解extend_logprob_start_len = extend_logprob_start_lens - prefix_len
self.normalized_prompt_logprob #归一化后prompt的logits
# _idx 的list,即token 本身(idx 指词表里的index)
# _val 的list,即log值,即分布概率
# _output 和 _input 即输入输出,top即按照val 的top分布
self.top_logprobs_num
self.output_token_logprobs_idx
self.output_token_logprobs_val
self.output_top_logprobs_idx
self.output_top_logprobs_val
self.input_token_logprobs_idx
self.input_token_logprobs_val
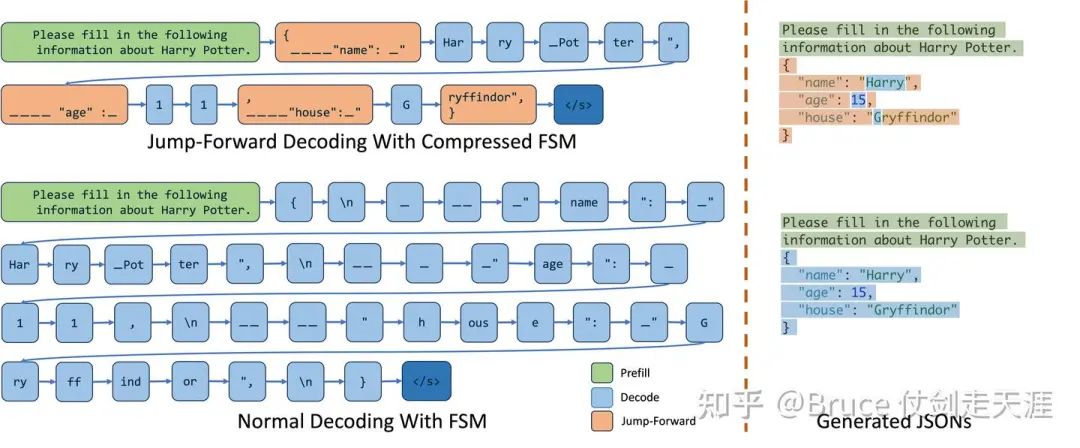
上面提到jump forward decodig,有些同学可能不熟悉,这里简单介绍一下jump forward,其实这很容易理解,prompt 有时候会是一种类似“完形填空”的方式,而我们只需要生成其中”空白“的部分,不需要生成prompt 已经有的部分。图例如下。
最后我们再介绍一下req 几个比较重要的成员函数。
第一组:
finished() && check_finished() 用于判断是否可以结束,以及finished_reason 是哪种情况

第二组:
init_next_round_input #初始化本请求下一轮inference 需要的参数,比如计算需要用多长的kvcache
                     (主要是计算fill_ids和extend_input_len)

第三组:
init_incremental_detokenize 与 get_next_inc_detokenization
这两个函数通常是用于获取下一轮detokenizer 相关的参数并进行相关配置
逻辑上,detokenizer 自己会管理相关配置,req的这两个接口主要是for jump forward decoding,
由于jump forward的解码过程存在一些跳跃,所以需要请求级别自己去配置
同理上面也只有jump forward 需要单独提供detokinizer的vid,其他detokenize manager 自己就可以管理

第四组:
jump_forward_and_retokenize
也是jump forward 相关
所以我们看到jump forward和结构化输出相关,在sglang 这边也是一个相当重要的角色。

第五组:
reset_for_retract
为了撤回decode,重置decode 参数,比如
ModelConfig & ForwardMode
为了更方便理解SchdeuleBatch,我们还需要了解两个类,一个是modelConfig,另一个是forwardmode。
forward mode 主要是说明了sglang 支持的各种inference 模式,包括如下8种。
class ForwardMode(IntEnum):
    # Prefill a new sequence. This is deprecated now. "EXTEND" covers this case.
    PREFILL = auto()
    # Extend a sequence. The KV cache of the beginning part of the sequence is already computed (e.g., system prompt).
    # 即带cache的prefill,场景上覆盖了PREFILL
    EXTEND = auto()
    # Decode one token.
    DECODE = auto()
    # Contains both EXTEND and DECODE when doing chunked prefill.
    # 即一个batch 里既有prefill,又有decode
    MIXED = auto()
    # No sequence to forward. For data parallel attention, some workers wil be IDLE if no sequence are allocated.
    IDLE = auto() # 空闲

    # Used in speculative decoding: verify a batch in the target model.
    TARGET_VERIFY = auto()
    # Used in speculative decoding: extend a batch in the draft model.
    DRAFT_EXTEND = auto()
    # 上面两个是投机推理的模式,自回归不会用到。了解投机推理的应该很好理解这两个阶段。

    # A dummy first batch to start the pipeline for overlap scheduler.
    # It is now used for triggering the sampling_info_done event for the first prefill batch.
    # 这是一个特殊的模式,用于初始化scheduler的各种配置和相关预热 ,是第一个batch的forward 模式
    DUMMY_FIRST = auto()
ModelConfig则是有关inference的配置。其中重要的参数如下:
self.model_path = model_path #模型路径
self.revision = revision     # 版本,主要是拿开源配置用
self.quantization = quantization #量化

# Parse args, huggingface 开源配置,还允许override 配置
self.model_override_args = json.loads(model_override_args)
self.hf_config = get_config(
            model_path,
            trust_remote_code=trust_remote_code,
            revision=revision,
            model_override_args=self.model_override_args,
        )
self.hf_text_config = get_hf_text_config(self.hf_config)
self.dtype = _get_and_verify_dtype(self.hf_text_config, dtype)

# Check model type
self.is_generation = is_generation_model(                               # 是不是生成模型
            self.hf_config.architectures, is_embedding
        )
self.is_multimodal = is_multimodal_model(self.hf_config.architectures)  # 是不是多模态
self.is_encoder_decoder = is_encoder_decoder_model(self.hf_config.architectures) #是不是encoder-decoder模式

# 模型的配置信息,比如是MHA还是MLA,支持最大上下文长度,各自dim,lora/rope
# 逻辑上有了下面这堆参数,我们可以计算出kvcache需要多少
self.context_len = context_length
self.head_dim = 256
self.attention_arch = AttentionArch.MLA
self.kv_lora_rank = self.hf_config.kv_lora_rank
self.qk_rope_head_dim = self.hf_config.qk_rope_head_dim
self.num_attention_heads = self.hf_text_config.num_attention_heads
self.num_key_value_heads = self.num_attention_heads
self.hidden_size = self.hf_text_config.hidden_size
self.num_hidden_layers = self.hf_text_config.num_hidden_layers

self.vocab_size = self.hf_text_config.vocab_size #词表大小,和tokenizer/sampling有关
self.hf_eos_token_id = self.get_hf_eos_token_id() # 终止tokenlist
ScheduleBatch->ModelWorkerBatch->ForwardBatch
接下来,我们隆重介绍batch三兄弟里的第一位,schedule batch,他是最上层的batch 结构,和scheduler 直接交互。有了以上的铺垫,理解scheduleBatch就相对简单了。
reqs: List[Req]                          # batch 内包含的req list
decoding_reqs: List[Req] = None          # 仅包含需要decoding的req list(区别于prefill,extend)
req_to_token_pool: ReqToTokenPool = None # 使用的req_to_token_pool和token_to_kv_pool,tree_cache
token_to_kv_pool: BaseTokenToKVPool = None
tree_cache: BasePrefixCache = None
推理配置,用于说明当前batch的类型,模型参数,sampling参数。
# Batch configs
model_config: ModelConfig = None
forward_mode: ForwardMode = None
enable_overlap: bool = False #允许overlap,减少overhead,提高性能
# Device
device: str = "cuda"
# 能否使用cuda graph跑dp
can_run_dp_cuda_graph:bool
batch 信息,即一个batch 包含哪些请求级信息
# Sampling info,提供next_batch的采样信息是为了更多信息进行性能优化
sampling_info: SamplingBatchInfo = None
next_batch_sampling_info: SamplingBatchInfo = None

#req 里各项的list, like: batch.input_ids = [req0.input_ids, req1.input_ids... ]
input_ids: torch.Tensor = None
input_embeds: torch.Tensor = None
req_pool_indices: torch.Tensor = None
seq_lens: torch.Tensor = None

# req_pool_indice是req_to_token_pool里的索引,out_cache_loc 是token_to_kv_pool里的索引
# The output locations of the KV cache
out_cache_loc: torch.Tensor = None
output_ids: torch.Tensor = None #输出list

# The sum of all sequence lengths
seq_lens_sum: int = None

# For DP attention
global_num_tokens: Optional[List[int]] = None

# For extend and mixed chunekd prefill
prefix_lens: List[int] = None
extend_lens: List[int] = None
extend_num_tokens: int = None
这里辨析一下,seq_lens,seq_lens_sum,global_num_tokens,extend_num_tokens 的区别:
-
• seq_lens 是一个list(或者tensor),每个请求的seq_len是内部一项 -
• seq_lens_sum 是seq_lens的总和,即sum(seq_lens), 对于prefill是个重要的负载参考 -
• global_num_tokens 是系统内所有的token和,简单理解就是假如我们有4个dp worker,每个dp worker有一个seq_lens_sum,global_num_tokens即4个dp worker的seq_lens_sum之和 -
• extend_num_tokens 即一个batch内用于extend计算的token数量
其他成员变量还包括特殊请求的模式相关,如下。
# For encoder-decoder encoder-decoder架构
encoder_cached: Optional[List[bool]] = None
encoder_lens: Optional[torch.Tensor] = None
encoder_lens_cpu: Optional[List[int]] = None
encoder_out_cache_loc: Optional[torch.Tensor] = None

# Stream #流式请求
has_stream: bool = False

# Has grammar #结构化请求
has_grammar: bool = False

# Speculative decoding #投机推理
spec_algorithm: SpeculativeAlgorithm = None
spec_info: Optional[SpecInfo] = None
接下来可以介绍scheduleBatch的几个核心成员函数了。首先是资源分配释放相关。

alloc_req_slots,为reqs里每个req分配req_to_token_pool 里的一个独立的索引/slot
alloc_token_slots,为每个token 分配token_to_kv_pool 里的一个独立的索引
check_decode_mem,看看有没有out of mem(看看token_to_kv_pool 有没有空slot)
# 我们稍微详细展开说明一下check_decode_mem 函数,buf_multiplier在投机推理下会变,我们默认为1即可
def check_decode_mem(self, buf_multiplier=1):
        bs = len(self.reqs) * buf_multiplier
        # 如果当前剩余显存,够当前bs 推理,则返回true
        if self.token_to_kv_pool.available_size() >= bs:
            return True

        # 从当前的tree_cache 中,尝试清理足够的显存出来,具体清理逻辑看上述evict的说明
        self.tree_cache.evict(bs, self.token_to_kv_pool.free)
        # 如果清理后,有足够显存,则返回true,其他返回flase
        if self.token_to_kv_pool.available_size() >= bs:
            return True

        return False
然后是为各种forward模式准备batch info,如下,理解了batchinfo的字段含义,理解这些代码是比较简单的。主要注意的是,这里会真实操作kvcache,比如prepare_for_decode会调用alloc_token_slots为token 分配显存空间,而prepare_for_extend 还会多调用alloc_req_slots 分配请求空间(就是一条record)。
prepare_for_idle
prepare_for_extend
prepare_for_decode
prepare_encoder_info_extend
prepare_encoder_info_decode
mix_with_running
batch操作相关
def filter_batch(
        self,
        being_chunked_req: Optional[Req] = None,
        keep_indices: Optional[List[int]] = None,
    )
#该函数用于获得过滤后的batch,过滤条件是req的req_pool_indice在keep_indices内。
#或者keep_indices为None下,过滤条件是reqs中不为being_chunked_req的请求而且请求没有结束

def merge_batch(self, other: "ScheduleBatch"):
#将others里的batch 合并到本batch中,这里有一个值得注意的是,为了保障安全
#我们需要将sampling 先进行合并,因为sampling内惩罚的合并是依赖合并前的batch 请求的

get_model_worker_batch
# 用于将一个schedulebatch 转变成tp worker可以处理的ModelWorkerBatch,参数和schedulebatch几乎没有差别
# 但ModelWorkerBatch有一个用triton的write_req_to_token_pool_triton,成员函数
# 大家可以看看triton api怎么操作python指针,比如req_to_token_pool的指针并进行数据修改
特殊情况,比如jump forward和撤回,按照前面的解释理解即可。
retract_decode,check_for_jump_forwardforwardbatch 是 batch 三兄弟的最后一个,逻辑上这一部分和Flashinfer等attentionBackend 关系更密切。本应该放到下篇讲,但是这个结构也是承上启下的中枢,forwardbatch 之上可以认为是runtime的代码,forward 以下是真正推理层的代码。
Class ForwardBatch:
    # The forward mode
    forward_mode: ForwardMode
    # The batch size
    batch_size: int
    # The input ids
    input_ids: torch.Tensor
    # The indices of requests in the req_to_token_pool
    req_pool_indices: torch.Tensor
    # The sequence length
    seq_lens: torch.Tensor
    # The indices of output tokens in the token_to_kv_pool
    out_cache_loc: torch.Tensor
    # The sum of all sequence lengths
    seq_lens_sum: int
    .....
    # Position information
    positions: torch.Tensor = None
    # For Qwen2-VL
    mrope_positions: torch.Tensor = None
    gathered_buffer: Optional[torch.Tensor] = None
前面部分的数据结构和scheduleBatch 相似,都是batch 相关信息,我们讲一下后面的三个参数。
positions和mrope_positions位置编码参数,是forwardBatch 构造过程才被赋予的,后者是qwen vl 才需要。
而gathered_buffer 是为了gather 所有tp上的数据申请的buffer,dp 才会使用,我们也先按下不表。
forwardBatch主要接口是init_new ,用于基于WorkerModelPatch 获得一个forwardBatch。
不过虽然有这么多mode,实际上推理时都会规约成3类,如下,包括extend/prefill/mixed以及投机推理的情况,都会被认为是extend类型,最后通过backend的extend 接口进行forward,decode和idle 各自作为一种类型。
def is_extend(self):
    return (
        self == ForwardMode.EXTEND
        or self == ForwardMode.MIXED
        or self == ForwardMode.DRAFT_EXTEND
        or self == self.TARGET_VERIFY
    )

def is_decode(self):
    return self == ForwardMode.DECODE
def is_idle(self):
    return self == ForwardMode.IDLE
scheduler的初始化与核心流程
了解了核心数据结构,让我们从顶层schedule 角度看一下cache是如何被使用的。
scheduler 实在是一个功能庞大的集合,这里可以看到许多sglang的内部设计细节,比如用zmq 与tokenizer 进程通信,batch的管理等等,但为了篇幅,我们只集中关注和cache 相关的部分,以及可能涉及到的batch和请求 管理相关逻辑上。先看一下这个sglang 大的执行框架。(有时间补图)
Launch SRT (SGLang Runtime) Server

    The SRT server consists of an HTTP server and the SRT engine.

    1. HTTP server: A FastAPI server that routes requests to the engine.
    2. SRT engine:
        1. TokenizerManager: Tokenizes the requests and sends them to the scheduler.
        2. Scheduler (subprocess): Receives requests from the Tokenizer Manager, schedules batches, forwards them, and sends the output tokens to the Detokenizer Manager.
        3. DetokenizerManager (subprocess): Detokenizes the output tokens and sends the result back to the Tokenizer Manager.

    Note:
    1. The HTTP server and TokenizerManager both run in the main process.
    2. Inter-process communication is done through ICP (each process uses a different port) via the ZMQ library.
以上注释位于python/sglang/srt/server.py,在这里整体流程控制在tokenizerManager,httpserver是很薄的,所以这里TokenizerManager是主进程,请求从tokenizerManager进sglang engine,推理结果也最终返回给TokenizerManager,再返回给http server。scheduler和DetokenizerManager 都是子进程,通过mp 拉起来的, 他们之间通过zmq 跨进程通信。现在我们主要关注scheduler,是核心推理进程。scheduler 被server 拉起的主函数如下。
-
• 环境亲和性(cpu,gpu affinity) -
• 在scheduler进程上初始化scheduler类 -
• 进任务循环
if get_bool_env_var("SGLANG_SET_CPU_AFFINITY"):
        set_gpu_proc_affinity(server_args.tp_size, server_args.nnodes, gpu_id)

    parent_process = psutil.Process().parent()

    # Create a scheduler and run the event loop
    try:
        scheduler = Scheduler(server_args, port_args, gpu_id, tp_rank, dp_rank)
        pipe_writer.send(
            {"status": "ready", "max_total_num_tokens": scheduler.max_total_num_tokens}
        )
        if scheduler.enable_overlap:
            scheduler.event_loop_overlap()
        else:
            scheduler.event_loop_normal()
    except Exception:
        traceback = get_exception_traceback()
        logger.error(f"Scheduler hit an exception: {traceback}")
        parent_process.send_signal(signal.SIGQUIT)
从中可以看到scheduler 我们只关注两个函数,初始化__init__和event_loop_xxx。
scheduler 的初始化
一开始其实就是几步:
-
• 和tokenizerManager,detokenizer manager 建立zmq 连接 -
• 初始化modelconfig等相关系统配置 -
• 初始化tp_worker,tp worker 之间用nccl 通信(这里tp worker 包含tp和dp 两层rank,所以应该是2维去理解) -
• kv cache 和 调度队列相关初始化 -
• 一些特殊配置的初始化,比如多模态,encoder-decoder,投机推理,这些不是本次研究的核心,忽略
我们稍微注意一下tp worker的初始化,因为memory_pool 是从tp_worker里拿的。这里会一路调用到model_runner的初始化。首先说明一下包含关系。继续回忆上面的框架图。
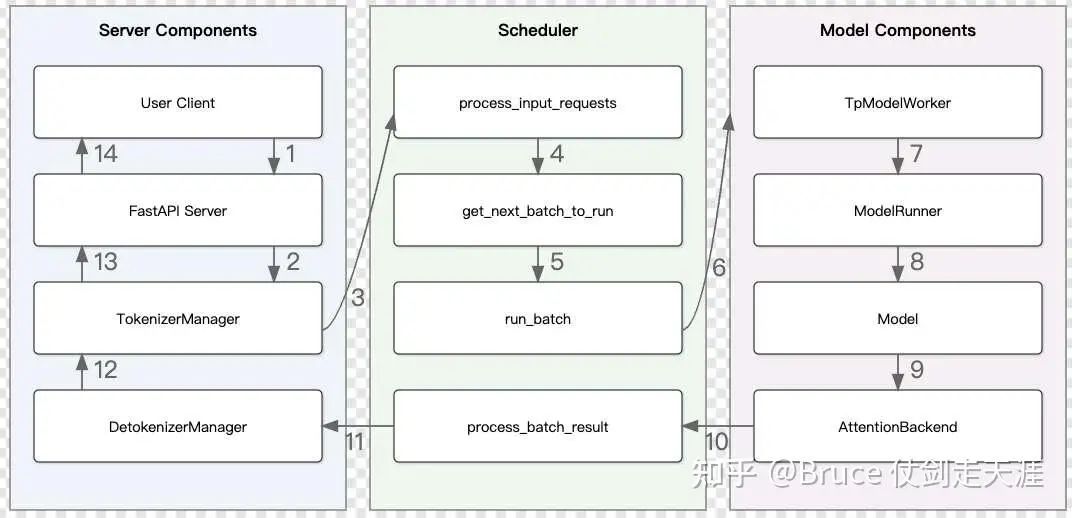
推理的底层核心逻辑在右侧的紫色部分,TpWorker,ModelRunner 以及AttentionBackend 是后面一篇文章的核心,这里仅仅浅浅介绍一下。
首先是TpWorker,TpWorker 是一个完整的worker 线程,不仅仅和tp相关,也和dp相关。所以tpworker的数量是tp_num * dp_num。如下是初始参数,这些参数也会被传给TpWorker里的model_runner。
class TpModelWorker:
    """A tensor parallel model worker."""

    def __init__(
        self,
        server_args: ServerArgs,
        gpu_id: int,
        tp_rank: int,
        dp_rank: Optional[int],
        nccl_port: int,
        is_draft_worker: bool = False,
    ):
至于TpWorker与TpWorkerClient的关系,其实就是同步和异步的差别,sglang中二者互斥,不可同时共存。TpWorker 自己没有独立的工作线程,都是接口函数,被scheduler 调用;TpWorkerClient则内部有一个自己的工作线程forward_thread_func_,scheduler 通过TpWorkerClient的接口,将任务提交到forward_thread_func_上,由该线程自己调度,以实现更好的overlap,如果enable_overlap 为True,则会选择TpWorkerClient模式。有关TpWorkerClient的工作原理,这里推荐一片文章
深入探讨SGLang异步调度机制:如何实现CPU与GPU流水线的重叠
提到enable_overlap,也介绍当前几个限制。
-
• 非生成模型,比如embedding,禁止enable_overlap -
• 多模态模型,当前禁止enable_overlap -
• 如果enable_overlap,关闭jump forward(不理解为什么disable)。
TpWorker 相对比较薄,重点是ModelRunner,这个东西比较重,我们仅仅介绍其中5个成员函数,与推理过程中的kvcache 操作有比较重要的关系。此外modelRunner 还有一个重要功能,调用model_loader 加载模型。
min_per_gpu_memory = self.init_torch_distributed()
# 这里的关键有几点:
# 1. 初始化分布式beckend,如果是cuda,则会用nccl的后端,
#。   这里的关键函数是init_distributed_environment,从vllm import过来的,这部分分布式以后单独出个章节写
# 2. 获得当前系统中可用的显存(对齐到多个rank上的最小值)
#     这里的关键函数是get_available_gpu_memory,先拿local的free memory,再通过torch.distributed.ReduceOp.MIN
#     获得多个rank中的最小值,作为整个分布式系统的采用值,有趣的是,sglang 还拿最终值和本地值做了一次比较
#     如果min_per_gpu_memory < local_gpu_memory * 0.9, 则会系统层面抛错

self.init_memory_pool(
            min_per_gpu_memory,
            server_args.max_running_requests,
            server_args.max_total_tokens,
        )
# 有了min_per_gpu_memory,就可以初始化memory pool了
# max_running_requests是最多可用跑多少请求,max_total_tokens是可以存多少token
# 注意,这里最终传递给token_to_kv_pool的tokens_num 是min(max_total_tokens, profile_num_tokens(min_per_gpu_memory)
# 所以其实是取用户配置和系统状态中的小值
# 分别是req_to_token_pool 和 token_to_kv_pool的数组的一维维度
# 这里也有几个关键步骤:
# 1. 确实kv cache 存储的数据类型,这个配置参数会传进来
# 2. 初始化req_to_token_pool, 维度为(max_num_reqs + 1,self.model_config.context_len + 4)
#         不过这里+1,+4 都是为啥,没看明白
# 3. 根据model config 里的attention,架构,选择对应的token_to_kv_pool,比如MLA,MHA,doubleSparsity等
#          维度是(self.max_total_num_tokens, (head_num, head_dim, layer_num))

if self.device == "cuda":
    self.init_cublas()
    self.init_attention_backend()
    self.init_cuda_graphs()
# 这部分,则是对attentionBackend的初始化,主要包括:
# cublas的初始化(用一个小matmul 做系统预热),初始化attentionbackend和cudagraph
接下来我们关注的重点是kvcache和调度相关的初始化。与kv cache 相关的部分主要是如下。
# Init memory pool and cache
self.req_to_token_pool, self.token_to_kv_pool = self.tp_worker.get_memory_pool()

if (
    server_args.chunked_prefill_size is not None
    and server_args.disable_radix_cache
):
    self.tree_cache = ChunkCache(
        req_to_token_pool=self.req_to_token_pool,
        token_to_kv_pool=self.token_to_kv_pool,
    )
else:
    self.tree_cache = RadixCache(
        req_to_token_pool=self.req_to_token_pool,
        token_to_kv_pool=self.token_to_kv_pool,
        disable=server_args.disable_radix_cache,
    )
self.tree_cache_metrics = {"total": 0, "hit": 0}
self.policy = SchedulePolicy(self.schedule_policy, self.tree_cache)
可以看见SchedulePolicy 的初始化也传入了tree_cache,可见kvcache 管理也是直接影响调度的。由下也可见,默认使用radixCache。有了上述的铺垫,这里的内容也就很明了了。
然后是一些调度成员变量,下面会用到,这里也放一下,注释已经很清楚了。
# Init running status
self.waiting_queue: List[Req] = []
# The running decoding batch for continuous batching
self.running_batch: Optional[ScheduleBatch] = None
# The current forward batch
self.cur_batch: Optional[ScheduleBatch] = None
# The current forward batch
self.last_batch: Optional[ScheduleBatch] = None
self.forward_ct = 0 # 第几轮forward
self.forward_ct_decode = 0
self.num_generated_tokens = 0
self.last_decode_stats_tic = time.time()
self.stream_interval = server_args.stream_interval
self.current_stream = torch.get_device_module(self.device).current_stream()
接下来是调度过程中会改变调度逻辑的成员
self.init_new_token_ratio = min(
    global_config.default_init_new_token_ratio
    * server_args.schedule_conservativeness,
    1.0,
)
self.min_new_token_ratio = min(
    self.init_new_token_ratio
    * global_config.default_min_new_token_ratio_factor,
    1.0,
)
self.new_token_ratio_decay = (
    self.init_new_token_ratio - self.min_new_token_ratio
) / global_config.default_new_token_ratio_decay_steps
self.new_token_ratio = self.init_new_token_ratio

# Tells whether the current running batch is full so that we can skip
# the check of whether to prefill new requests.
# This is an optimization to reduce the overhead of the prefill check.
self.batch_is_full = False
上面代码包括两部分,第一部分是new_token_ratio的参数,这个用来控制解码过程中加入新token的比例,用于提高回复的新颖性。第二部分是batch_is_full ,如果当前batch 已经满了,就跳过插入请求的判断。
接着就是watchdog和metric的初始化。
watchdog 就是判断前后两次forward的时间间隔,大于watchdog timeout就认为僵尸/卡住。
metric 用来上报系统指标。
attentionBackend和cudaGraphrunner的初始化与flashinfer和具体推理逻辑有关,下篇介绍。
event_loop_normal
终于我们来到了本章的最后章节。scheduler 主循环。为了说明方便,选择event_loop_normal。
@torch.no_grad()
    def event_loop_normal(self):
        """A normal scheduler loop."""
        while True:
            recv_reqs = self.recv_requests()
            self.process_input_requests(recv_reqs)

            batch = self.get_next_batch_to_run()

            # 先不关注dp 这部分
            if self.server_args.enable_dp_attention:  # TODO: simplify this
                batch = self.prepare_dp_attn_batch(batch)

            self.cur_batch = batch

            if batch:
                result = self.run_batch(batch)
                self.process_batch_result(batch, result)
            else:
                # When the server is idle, so self-check and re-init some states
                self.check_memory()
                self.new_token_ratio = self.init_new_token_ratio

            self.last_batch = batch
这里我们主要关注get_next_batch_to_run,run_batch的部分。简单过一下其他几个函数:
-
• recv_requests: 从tokenizermanager 获得新请求(可能是新http请求,也可能是还没推理完需要继续推理的请求,也可能是其他类型的请求,比如flushcache,profile,closesession等等) -
• process_input_requests:处理进来的请求,主要是处理generation的请求,大部份类型的请求不需要进推理,所以走完这个函数也就完了,对于generation(也包括embedding)请求,则会构建Req class,插入到waiting_queue里 -
• 如果没有新batch,进行一些系统检查和参数初始化(new_token_ratio)
get_next_batch_to_run
接下来我们介绍一下核心函数之一get_next_batch_to_run。它的功能是判断下一个batch 做什么。
def get_next_batch_to_run(self) -> Optional[ScheduleBatch]:
        # Merge the prefill batch into the running batch
        # 这里的意思是合并batch,首先将chunked 请求从当前batch 里拿掉,释放相关资源
        # 然后将last_batch 的请求合并到当前running的请求中
        if self.last_batch and self.last_batch.forward_mode.is_extend():
            if self.being_chunked_req:
                # Move the chunked request out of the batch
                self.last_batch.filter_batch(being_chunked_req=self.being_chunked_req)
                self.tree_cache.cache_unfinished_req(self.being_chunked_req)
                # being chunked request keeps its rid but will get a new req_pool_idx
                self.req_to_token_pool.free(self.being_chunked_req.req_pool_idx)
                self.batch_is_full = False

            if not self.last_batch.is_empty():
                if self.running_batch is None:
                    self.running_batch = self.last_batch
                else:
                    self.running_batch.merge_batch(self.last_batch)

        # Run prefill first if possible
        # 如果有prefill的batch 请求,则优先处理prefill,chunked request 在这里会重新获得相关资源
        new_batch = self.get_new_batch_prefill()
        if new_batch is not None:
            return new_batch

        # Run decode
        if self.running_batch is None:
            return None
        # 剩下是decode 的请求,需要进行一些更新
        self.running_batch = self.update_running_batch(self.running_batch)
        return self.running_batch
这里再讲一下get_new_batch_prefill,其实这里有更多的插入判断逻辑。
def get_new_batch_prefill(self) -> Optional[ScheduleBatch]:
        # Check if the grammar is ready in the grammar queue
        if self.grammar_queue:
            self.move_ready_grammar_requests()

        # Handle the cases where prefill is not allowed
        # 如果batch 已经满了,或者没有新的waiting 请求,也没有chunked prefill请求
        # 特别提出来chunked请求,应该是和前面单独从running batch里摘出去了有关,这边要找补回来
        if (
            self.batch_is_full or len(self.waiting_queue) == 0
        ) and self.being_chunked_req is None:
            return None

        # 如果当running batch的size,达到了max_running_requests,说明满了,无法插入
        running_bs = len(self.running_batch.reqs) if self.running_batch else 0
        if running_bs >= self.max_running_requests:
            self.batch_is_full = True
            return None

        # Get priority queue,具体逻辑请回头看schedule_policy的部分
        prefix_computed = self.policy.calc_priority(self.waiting_queue)

        # Prefill policy,构建一个PrefillAdder类进行插入处理,具体逻辑和接口函数上面有写
        adder = PrefillAdder(
            self.tree_cache,
            self.running_batch,
            self.new_token_ratio,
            self.token_to_kv_pool.available_size() + self.tree_cache.evictable_size(),
            self.max_prefill_tokens,
            self.chunked_prefill_size,
            running_bs if self.is_mixed_chunk else 0,
        )

        has_being_chunked = self.being_chunked_req is not None
        if has_being_chunked:
            self.being_chunked_req.init_next_round_input()
            self.being_chunked_req = adder.add_being_chunked_req(self.being_chunked_req)

        # Get requests from the waiting queue to a new prefill batch
        # 从新请求的waiting 队列里拿出来,构建请求,如果发现已满,则跳出循环
        for req in self.waiting_queue:
            if (
                self.lora_paths
                and len(
                    lora_set
                    | set([req.lora_path for req in adder.can_run_list])
                    | set([req.lora_path])
                )
                > self.max_loras_per_batch
            ):
                self.batch_is_full = True
                break

            if running_bs + len(adder.can_run_list) >= self.max_running_requests:
                self.batch_is_full = True
                break

            req.init_next_round_input(None if prefix_computed else self.tree_cache)
            res = adder.add_one_req(req)
            if res != AddReqResult.CONTINUE:
                if res == AddReqResult.NO_TOKEN:
                    self.batch_is_full = True
                break
            if self.server_args.prefill_only_one_req:
                break

        # Update waiting queue
        # 如果can_run_list 里为空,也就是因为某些原因,add_one_req 没有返回AddReqResult.CONTINUE的情况
        # 返回None,说明没有新prefill 请求
        # 那前面说的chunked 请求呢?已经调用过add_being_chunked_req,如果成功也会在can_run_list里
        can_run_list = adder.can_run_list
        if len(can_run_list) == 0:
            return None
        ## waiting queue重组,不在can run list 里扔进去
        self.waiting_queue = [
            x for x in self.waiting_queue if x not in set(can_run_list)
        ]
        # 构建一个ScheduleBatch,所以prefill 会拥有一个新batch
        # 合理,因为prefill是新请求触发的,请求触发batch 合理
        new_batch = ScheduleBatch.init_new(
            can_run_list,
            self.req_to_token_pool,
            self.token_to_kv_pool,
            self.tree_cache,
            self.model_config,
            self.enable_overlap,
            self.spec_algorithm,
        )
        然后为各种forward mode的schedulebatch prepare一下即可
最后是update_running_batch,这里会对decode 类型的batch 进行进一步处理。
def update_running_batch(self, batch: ScheduleBatch) -> Optional[ScheduleBatch]:
  initial_bs = batch.batch_size()

  # 这里的filter 逻辑上其实是再过滤一遍,去掉已经结束的请求,以及prefill的请求
  batch.filter_batch()
  if batch.is_empty():
      self.batch_is_full = False
      return None

  # 判断是不是超过了decode mem
  if not batch.check_decode_mem(self.decode_mem_cache_buf_multiplier) or (
      test_retract and batch.batch_size() > 10
  ):
      #如果oom,撤回当前的decode batch,塞到waiting 队列中
      # 重新设置new_token_ratio
      retracted_reqs, new_token_ratio = batch.retract_decode()
      self.new_token_ratio = new_token_ratio
      self.waiting_queue.extend(retracted_reqs)
  else:
      # 每次decode 都会减小新token生成概率
      self.new_token_ratio = max(
          self.new_token_ratio - self.new_token_ratio_decay,
          self.min_new_token_ratio,
      )

  # Check for jump-forward,判断需不需要jump forward,jump forward 请求也会被filter 出来
  # 不当作decode 请求进行推理,放进waiting_queue,作为新请求处理(走extend/prefill mode)
  if not self.disable_jump_forward:
      jump_forward_reqs = batch.check_for_jump_forward(self.pad_input_ids_func)
      self.waiting_queue.extend(jump_forward_reqs)
      if batch.is_empty():
          self.batch_is_full = False
          return None

  # 再次判断有没有满batch
  if batch.batch_size() < initial_bs:
      self.batch_is_full = False

  # Update batch tensors
  # 为请求分配具体的kv cache,即分配token_to_kv_pool 里的值
  batch.prepare_for_decode()
  return batch
从上述可以看到,get_next_batch_for_run 是一个调度函数,明确下一个batch 具体跑什么类型的哪些请求。我们也可以看到waiting queue和batch 这两个核心结构的用处,waiting queue 放的是需要prefill的请求,不论是新请求,chunked prefill 请求还是jump forward 请求,都会放进waiting queue,等get_new_batch_prefill 对这种请求进行处理、解析并构造一个新的batch。而decode 阶段,会根据上一轮推理的结果,合并batch,尽量将decode 变成一个大的batch进行处理,如果过程中发现存在需要jump forward的请求,则会释放资源,丢回waiting_queue,等get_new_batch_prefill 再去重新分配。
run_batch
第二个核心函数 run_batch。
def run_batch(self, batch: ScheduleBatch):
        """Run a batch."""
        self.forward_ct += 1

        if self.is_generation:
            if batch.forward_mode.is_decode() or batch.extend_num_tokens != 0:
                if self.spec_algorithm.is_none():
                    model_worker_batch = batch.get_model_worker_batch()
                    logits_output, next_token_ids = (
                        self.tp_worker.forward_batch_generation(model_worker_batch)
                    )
                else:
                    (
                        logits_output,
                        next_token_ids,
                        model_worker_batch,
                        num_accepted_tokens,
                    ) = self.draft_worker.forward_batch_speculative_generation(batch)
                    self.num_generated_tokens += num_accepted_tokens
            elif batch.forward_mode.is_idle():
                model_worker_batch = batch.get_model_worker_batch()
                self.tp_worker.forward_batch_idle(model_worker_batch)
                return
            else:
                logits_output = None
                if self.skip_tokenizer_init:
                    next_token_ids = torch.full(
                        (batch.batch_size(),), self.tokenizer.eos_token_id
                    )
                else:
                    next_token_ids = torch.full((batch.batch_size(),), 0)
            batch.output_ids = next_token_ids
            ret = logits_output, next_token_ids, model_worker_batch.bid
        else:  # embedding or reward model
            assert batch.extend_num_tokens != 0
            model_worker_batch = batch.get_model_worker_batch()
            embeddings = self.tp_worker.forward_batch_embedding(model_worker_batch)
            ret = embeddings, model_worker_batch.bid
        return ret
我们先不看其他的branch 逻辑,我们只关注is_generation的部分,也就是生成模型相关,确切的说,只需要理解is_generation的前两个branch。
第一个branch 进去是主逻辑。接下来我们逐步分析
self.forward_ct += 1首先是forward_ct,这个其实就是计数,watchdog 会观察计数变更的间隔,超过阈值,就会报僵尸或者hung住的告警。
if self.is_generation:
            if batch.forward_mode.is_decode() or batch.extend_num_tokens != 0:
                if self.spec_algorithm.is_none():
观察上面这个判断,其实is_decode 很明确,decode 的batch,extend_num_tokens!=0 其实就包括extend和prefill 请求的情况, 当然也包括mix infer的情况,所以generation下,主要是通过这个分支进推理,spec_algorithm.is_none就是非投机推理,也就是自回归解码的模式。
model_worker_batch = batch.get_model_worker_batch()几乎就是一个赋值过程,转成了workerBatch的结构而已。
self.tp_worker.forward_batch_generation(model_worker_batch)

# 真正forward 函数,包括forward和sample 过程,这里的launch_done目前没有地方调用,忽略即可
def forward_batch_generation(
        self,
        model_worker_batch: ModelWorkerBatch,
        launch_done: Optional[threading.Event] = None,
    ):
        #构建一个forwardBatch,forwardBatch里已经有了完整的需要的batch信息(包括位置编码信息)
        forward_batch = ForwardBatch.init_new(model_worker_batch, self.model_runner)
        # forward 推理,获得logits
        logits_output = self.model_runner.forward(forward_batch)
        if launch_done:
            launch_done.set()
        # 采样,从logits->tokens
        next_token_ids = self.model_runner.sample(logits_output, model_worker_batch)
        return logits_output, next_token_ids
而model_runner.forward 逻辑是如下的, 可以见到如果forwardbatch 支持cudagraph,则会优先以cudagraph 方式执行,否则根据各自的forward mode进行推理。
  def forward(self, forward_batch: ForwardBatch) -> LogitsProcessorOutput:
      if (
          forward_batch.forward_mode.is_cuda_graph()
          and self.cuda_graph_runner
          and self.cuda_graph_runner.can_run(forward_batch)
      ):
          return self.cuda_graph_runner.replay(forward_batch)

      if forward_batch.forward_mode.is_decode():
          return self.forward_decode(forward_batch)
      elif forward_batch.forward_mode.is_extend():
          return self.forward_extend(forward_batch)
      elif forward_batch.forward_mode.is_idle():
          return self.forward_idle(forward_batch)
      else:
          raise ValueError(f"Invalid forward mode: {forward_batch.forward_mode}")
我们浅浅挑一个子函数,看看实现
def forward_decode(self, forward_batch: ForwardBatch):
        self.attn_backend.init_forward_metadata(forward_batch)
        return self.model.forward(
            forward_batch.input_ids, forward_batch.positions, forward_batch
        )
这里的两个函数就是我们下篇研究attentionBackend 需要核心涉及的函数,这两个接口函数语义比较明确,为forward 在attentionBackend 准备控制信息,并进行实际的forward。具体逻辑先按下不表。
从这里开始,forward的栈如下,大家可以直接看gpt2 model的实现,比较干净和方便分析。在Model,layer和attentionBackend 会涉及set_kv_buffer的操作。
ModelRunner->Model->layer->attentionBackendAt Last-总结
好,现在回到我们的title,本文旨在理解sglang 中的cache,req和batch。接下来我们根据上面的学习笔记,总结这三者。
cache 是被谁使用的?
cache在sglang中,相关的主要是req_to_token_pool, token_to_kv_pool,tree_cache 三个结构。
其中req_to_token_pool 是 一级pool,存储的是请求和token的映射关系;
token_to_kv_pool 是二级pool,存储的是token 和 kvcache的映射关系;
tree_cache 其实是联系两个pool的组织结构,scheduler 调度过程中会频繁访问,并为请求分配req_to_token_pool和token_to_kv_pool中的slot,tree_cache 在调度策略中是个关键角色,根据prefix match的情况,会决定当前请求何时被prefill。
req_to_token_pool和token_to_kv_pool则是实际的pool,对于backend来说,是get & set的对象,尤其是token_to_kv_pool,会调用set_kv_buffer。而req_to_token_pool 则是被scheduler set,被backend/model get的对象。
回到这张图,这里比较完整说明了batch和cache的关系。
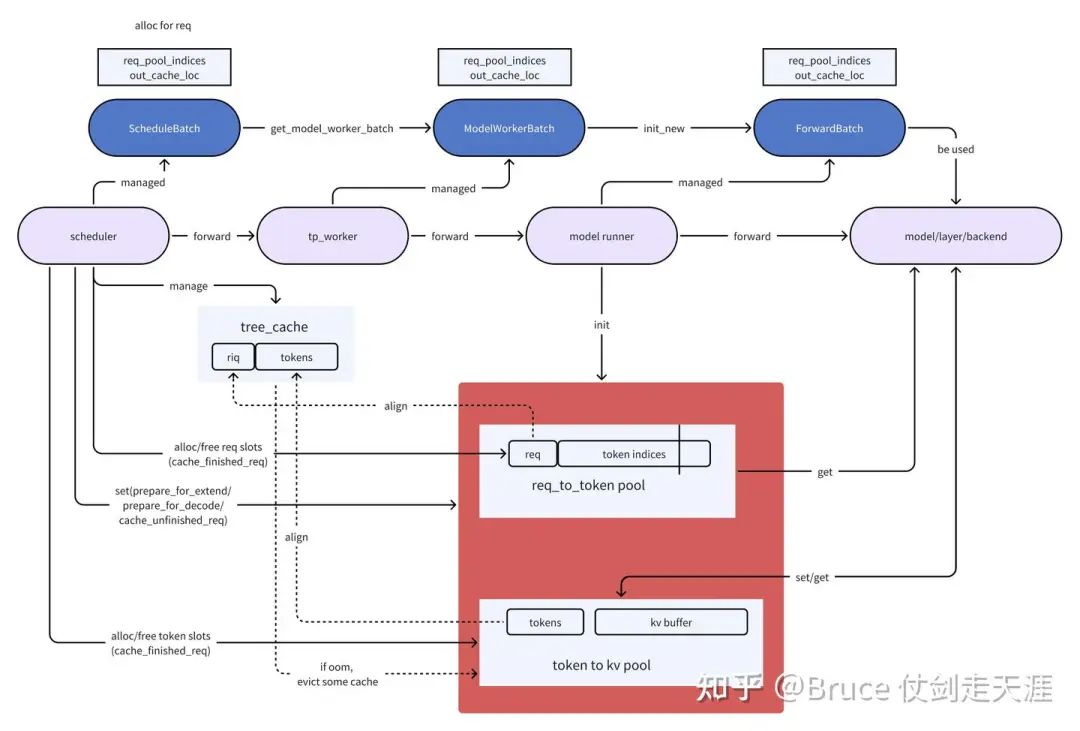
从Req 的lifecycle 观察 cache的lifecycle
另一部分是Req 与 batch的关系,这里我们需要描述scheduler的主体逻辑。
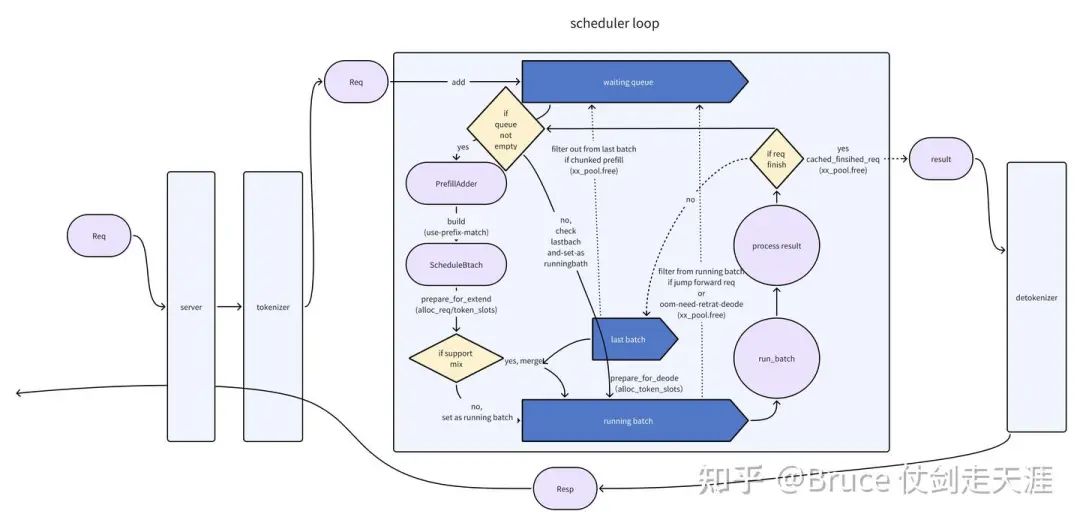
上图我们表述了一个请求的一生,从http server 进来后,传给tokenizer,然后传给schedule 进程。请求先放到waiting queue,随后被scheduler 取出,通过PrefillAdder 构建一个scheduleBatch,作为running batch 进行推理(forward & sample)。如果run_batch完请求结束,发给detokinizer,随后回到tokenizer,从http server 出去。
注意请求的构建和释放,涉及上述cache 资源的分配和释放。
如果run_batch 后请求没有结束,则进行下一轮推理,这里有几个判断。
首先,之前的请求是不是chunked prefill 请求,且prefill 还没有做完,如果是,扔回waiting queue(一切需要prefill的请求,都进waitqueue,作为prefill 请求的总生产者)。
然后,看看waiting queue里有没有新item,有的话,接下来作为mix_running (如果支持mix infer)或者 处理 extend/prefill 请求的batch(上一个请求的decode 被延后)。
如果接下来要做的是decode,判断是否接下来是jump forward请求,如果是,扔回waiting queue(需要prefill),否则进行decode的推理。如果oom,需要撤回当前batch并后续重新build batch,也会扔回waitingqueue。
从上面我们可以看到宏观的cache 在scheduler 里是何时分配,释放的。
scheduler 里如何使用Cache
最后我们补充一下sglang中如何使用cache,也就是set的时机,由于scheduler 主要set req_to_token_pool,所以我们这里也主要介绍req_to_token_pool的逻辑,基于上述源码,理清这里的逻辑线。
scheduler set req_to_token_pool的时机有四个,其中process_batch_result_prefill和get_next_batch_to_run依赖cache_unfinished_req 执行。
|
|
|
|
|
2. 需要单独推理的tokens。从token_to_kv_pool 分配tokens,写进req_to_token pool里 |
|
|
|
|
|
|
|
|
|
为了更好的理解cache的操作,我认为可以仔细看看cache_unfinished_req 这个函数的实现(radix 版本)。
def cache_unfinished_req(self, req: Req, token_ids: Optional[List[int]] = None):
        """Cache request when it is unfinished."""
        if self.disable:
            return

        if token_ids is None:
            token_ids = req.fill_ids

        # 获得当前完整的输入输出,及其对应的token_to_kv_pool 里的indices
        kv_indices = self.req_to_token_pool.req_to_token[
            req.req_pool_idx, : len(token_ids)
        ]

        # Radix Cache takes one ref in memory pool
        # insert 过程中重新获得prefix cache的长度,并释放token_to_kv_pool 中重复token的部分
        new_prefix_len = self.insert(token_ids, kv_indices.clone())
        self.token_to_kv_pool.free(kv_indices[len(req.prefix_indices) : new_prefix_len])

        # The prefix indices could be updated, reuse it
        new_indices, new_last_node = self.match_prefix(token_ids)
        assert len(new_indices) == len(token_ids)
        # 调用前缀匹配,获得新的prefix indices,将其中未写入的部分写入req_to_token_pool
        self.req_to_token_pool.write(
            (req.req_pool_idx, slice(len(req.prefix_indices), len(new_indices))),
            new_indices[len(req.prefix_indices) :],
        )

        # 加引用
        self.dec_lock_ref(req.last_node)
        self.inc_lock_ref(new_last_node)
        req.prefix_indices = new_indices
        req.last_node = new_last_node
cache_unfinished_req 是一个经典函数,我们可以了解tree_cache,与req_to_token_pool和token_to_kv_pool的相互关系。同时我们可以感觉到sglang 团队对于显存的利用是比较高的,去掉了很多可能的冗余(重复token的kvcache 存储等等)。
这里其实还有一个关键函数是match_prefix,这里其实决定了cache 复用的情况和调度层对cache 复用情况的使用方法。他被用于计算调度的优先级。这一块核心逻辑可以参考schedule policy的说明。
引用链接
[1] flashinfer:https://arxiv.org/pdf/2501.01005[2]code walk through:https://github.com/zhaochenyang20/Awesome-ML-SYS-Tutorial/tree/main/sglang/code-walk-through[3]python/sglang/srt/mem_cache:https://github.com/sgl-project/sglang/tree/b5fb4ef58a6bbe6c105d533b69e8e8bc2bf4fc3c/python/sglang/srt/mem_cache[4]python/sglang/srt/managers:https://github.com/sgl-project/sglang/tree/b5fb4ef58a6bbe6c105d533b69e8e8bc2bf4fc3c/python/sglang/srt/managers[5]python/sglang/srt/model_executor:https://github.com/sgl-project/sglang/tree/b5fb4ef58a6bbe6c105d533b69e8e8bc2bf4fc3c/python/sglang/srt/model_executor[6]python/sglang/srt/layers:https://github.com/sgl-project/sglang/tree/b5fb4ef58a6bbe6c105d533b69e8e8bc2bf4fc3c/python/sglang/srt/layers[7]flahsinfer:https://github.com/flashinfer-ai/flashinfer/tree/9f5fbee3230136b0ccf4a88938d0e244dcaf4b26
往期推荐

深入探讨SGLang异步调度机制:如何实现CPU与GPU流水线的重叠

SGLang代码快速上手(with openRLHF)

SGLang Runtime + Qwen2-7B!解锁开源模型高性能服务
(文:GiantPandaCV)
